概述
本篇文章主要讲述View是如何在Android源码中产生的,以便于我们能够更好的去自定义一些控件,大体上是按照View绘制的流程来走步骤,在追踪源码之前我们先了解几个基础知识。来看下面的这张图:
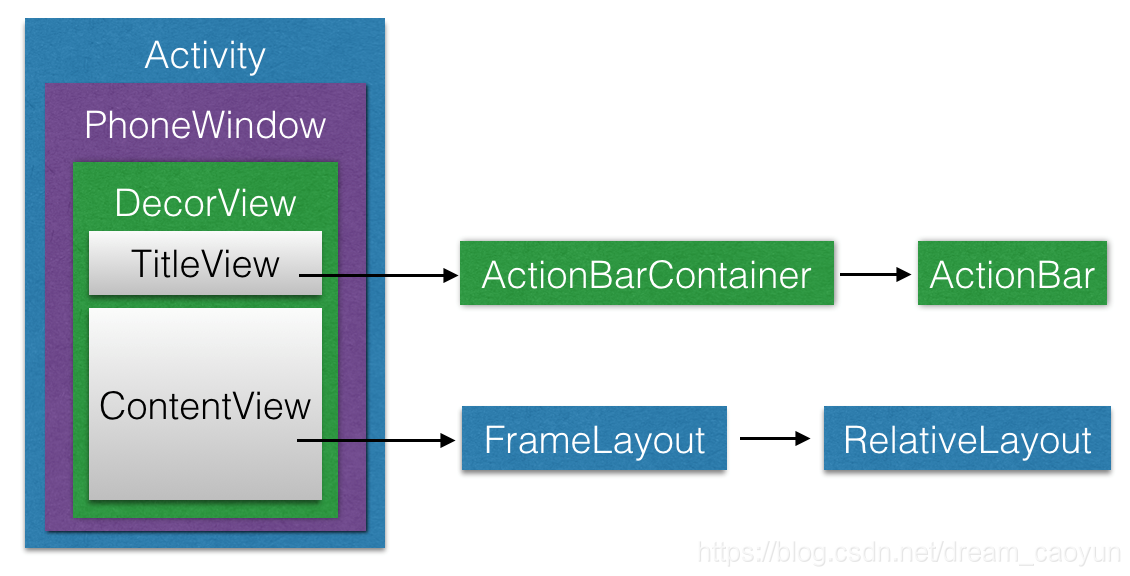
一张典型的系统View分解图,一个Activity对应一个PhoneWindow、一个DecorView,DecorView是应用窗口的根部局,其本质是一个FrameLayout,有唯一的一个子View垂直的LinerLayout,包含两个元素,TitleBar和ContentView,TitleBar大家都很熟悉,ContentView也是一个FrameLayout,它的子View就是在Activity组件中的OnCreate方法中setContentView(View)传递的View,这里也能看出来Activity是和window(PhoneWindow是其实现类)是相关联的,window是承载用户界面的。
android设计模式的应用场景。Window就是窗口,这个概念是在Android的Framework中android.view.window这个抽象类,这个抽象类是对Android系统所有窗口的抽象,那么什么是窗口?
事实上窗口是一个宏观的概念,通常指屏幕上用于绘制各种UI元素以及响应用户输入事件的矩形区域,有两个特点:
而android.view.window这个抽象类可以视为Android系统对窗口这一宏观概念所做的约定,而PhoneWindow这个类是framework为我们提供的窗口具体实现,现在我们来看看window这个类
这个抽象类包括三个核心组件:
安卓获取root原理,接下来看看Android中window唯一的实现类—PhoneWindow
前面我们提到了,PhoneWindow这个类是Framework为我们提供的Android窗口的具体实现。我们平时调用setContentView()方法设置Activity的用户界面时,实际上就完成了对所关联的PhoneWindow的ViewTree的设置。我们还可以通过Activity类的requestWindowFeature()方法来定制Activity关联PhoneWindow的外观,这个方法实际上做的是把我们所请求的窗口外观特性存储到了PhoneWindow的mFeatures成员中,在窗口绘制阶段生成外观模板时,会根据mFeatures的值绘制特定外观。下面这张手绘图是他们之间关系的说明:

在分析setContentView()方法前,我们需要明确:这个方法只是完成了Activity的ContentView的创建,而并没有执行View的绘制流程。
当我们自定义Activity继承自android.app.Activity时候,调用的setContentView()方法是Activity类的,源码如下:
public void setContentView(@LayoutRes int layoutResID) {   getWindow().setContentView(layoutResID);   . . .
}
getWindow()方法会返回Activity所关联的PhoneWindow,也就是说,实际上调用到了PhoneWindow的setContentView()方法,源码如下:
@Override
public void setContentView(int layoutResID) {if (mContentParent == null) {// mContentParent即为上面提到的ContentView的父容器,若为空则调用installDecor()生成installDecor();} else if (!hasFeature(FEATURE_CONTENT_TRANSITIONS)) {// 具有FEATURE_CONTENT_TRANSITIONS特性表示开启了Transition// mContentParent不为null,则移除decorView的所有子ViewmContentParent.removeAllViews();}if (hasFeature(FEATURE_CONTENT_TRANSITIONS)) {// 开启了Transition,做相应的处理,我们不讨论这种情况// 感兴趣的同学可以参考源码. . .} else {// 一般情况会来到这里,调用mLayoutInflater.inflate()方法来填充布局// 填充布局也就是把我们设置的ContentView加入到mContentParent中mLayoutInflater.inflate(layoutResID, mContentParent);}. . .// cb即为该Window所关联的Activityfinal Callback cb = getCallback();if (cb != null && !isDestroyed()) {// 调用onContentChanged()回调方法通知Activity窗口内容发生了改变cb.onContentChanged();}. . .
}
LayoutInflater.inflate()
在上面我们看到了,PhoneWindow的setContentView()方法中调用了LayoutInflater的inflate()方法来填充布局,这个方法的源码如下:
public View inflate(@LayoutRes int resource, @Nullable ViewGroup root) {return inflate(resource, root, root != null);
}public View inflate(@LayoutRes int resource, @Nullable ViewGroup root, boolean attachToRoot) {final Resources res = getContext().getResources();. . .final XmlResourceParser parser = res.getLayout(resource);try {return inflate(parser, root, attachToRoot);} finally {parser.close();}
}
在PhoneWindow的setContentView()方法中传入了decorView作为LayoutInflater.inflate()的root参数,我们可以看到,通过层层调用,最终调用的是inflate(XmlPullParser, ViewGroup, boolean)方法来填充布局。这个方法的源码如下:
public View inflate(XmlPullParser parser, @Nullable ViewGroup root, boolean attachToRoot) {synchronized (mConstructorArgs) {. . .final Context inflaterContext = mContext;final AttributeSet attrs = Xml.asAttributeSet(parser);Context lastContext = (Context) mConstructorArgs[0];mConstructorArgs[0] = inflaterContext;View result = root;try {// Look for the root node.int type;// 一直读取xml文件,直到遇到开始标记while ((type = parser.next()) != XmlPullParser.START_TAG &&type != XmlPullParser.END_DOCUMENT) {// Empty}// 最先遇到的不是开始标记,报错if (type != XmlPullParser.START_TAG) {throw new InflateException(parser.getPositionDescription()
+ ": No start tag found!");}final String name = parser.getName();. . .// 单独处理<merge>标签,不熟悉的同学请参考官方文档的说明if (TAG_MERGE.equals(name)) {// 若包含<merge>标签,父容器(即root参数)不可为空且attachRoot须为true,否则报错if (root == null || !attachToRoot) {throw new InflateException("<merge /> can be used only with a valid "
+ "ViewGroup root and attachToRoot=true");}// 递归地填充布局rInflate(parser, root, inflaterContext, attrs, false);} else {// temp为xml布局文件的根Viewfinal View temp = createViewFromTag(root, name, inflaterContext, attrs);ViewGroup.LayoutParams params = null;if (root != null) {. . .// 获取父容器的布局参数(LayoutParams)params = root.generateLayoutParams(attrs);if (!attachToRoot) {// 若attachToRoot参数为false,则我们只会将父容器的布局参数设置给根Viewtemp.setLayoutParams(params);}}// 递归加载根View的所有子ViewrInflateChildren(parser, temp, attrs, true);. . .if (root != null && attachToRoot) {// 若父容器不为空且attachToRoot为true,则将父容器作为根View的父View包裹上来root.addView(temp, params);}// 若root为空或是attachToRoot为false,则以根View作为返回值if (root == null || !attachToRoot) {result = temp;}}} catch (XmlPullParserException e) {. . .} catch (Exception e) {. . .} finally {. . .}return result;}
}
在上面的源码中,首先对于布局文件中的标签进行单独处理,调用rInflate()方法来递归填充布局。这个方法的源码如下:
void rInflate(XmlPullParser parser, View parent, Context context,AttributeSet attrs, boolean finishInflate) throws XmlPullParserException, IOException {// 获取当前标记的深度,根标记的深度为0final int depth = parser.getDepth();int type;while (((type = parser.next()) != XmlPullParser.END_TAG ||parser.getDepth() > depth) && type != XmlPullParser.END_DOCUMENT) {// 不是开始标记则继续下一次迭代if (type != XmlPullParser.START_TAG) {continue;}final String name = parser.getName();// 对一些特殊标记做单独处理if (TAG_REQUEST_FOCUS.equals(name)) {parseRequestFocus(parser, parent);} else if (TAG_TAG.equals(name)) {parseViewTag(parser, parent, attrs);} else if (TAG_INCLUDE.equals(name)) {if (parser.getDepth() == 0) {throw new InflateException("<include /> cannot be the root element");}// 对<include>做处理parseInclude(parser, context, parent, attrs);} else if (TAG_MERGE.equals(name)) {throw new InflateException("<merge /> must be the root element");} else {// 对一般标记的处理final View view = createViewFromTag(parent, name, context, attrs);final ViewGroup viewGroup = (ViewGroup) parent;final ViewGroup.LayoutParams params=viewGroup.generateLayoutParams(attrs);// 递归地加载子ViewrInflateChildren(parser, view, attrs, true);viewGroup.addView(view, params);}}if (finishInflate) {parent.onFinishInflate();}
}
我们可以看到,上面的inflate()和rInflate()方法中都调用了rInflateChildren()方法,这个方法的源码如下:
final void rInflateChildren(XmlPullParser parser, View parent, AttributeSet attrs, boolean finishInflate) throws XmlPullParserException, IOException {rInflate(parser, parent, parent.getContext(), attrs, finishInflate);
}
从源码中我们可以知道,rInflateChildren()方法实际上调用了rInflate()方法。
到这里,setContentView()的整体执行流程我们就分析完了,至此我们已经完成了Activity的ContentView的创建与设置工作。接下来,我们开始进入正题,分析View的绘制流程。
在介绍View绘制之前,我们需要知道是谁负责执行View绘制的整体流程,实际上是由ViewRoot来负责绘制的,每个应用程序窗口的DecorView都有一个与之对应的ViewRoot对象,这种关联关系是由WindowManager来管理的。
那么DecorView和ViewRoot是何时相关联的呢?是在ActivityThread类中handleMessage这个方法里(命名为H的Handler的子类中的方法),在case Activity_Resume:调用了handleActivityResume这个方法绑定的,具体相关联的时机和方式这里按下不表,感兴趣的话大家可以自己去翻源码,下面我们来分析ViewRoot如何绘制View
当建立好了DecorView和ViewRoot的联系之后,ViewRoot类的requestLayout方法就会被调用,,以完成应用程序用户界面的初次布局。实际被调用的是ViewRootImpl类的requestLayout()方法,这个方法的源码如下:
public void requestLayout() {if (!mHandlingLayoutInLayoutRequest) {// 检查发起布局请求的线程是否为主线程 checkThread();mLayoutRequested = true;scheduleTraversals();}
}
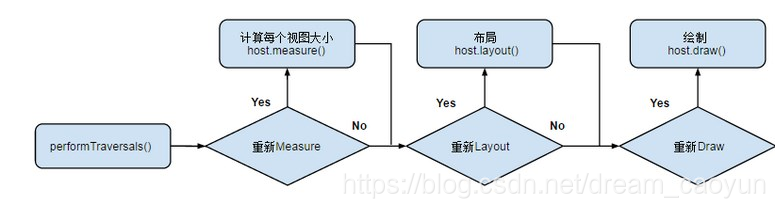
发起绘制的方法是scheduleTraversals(),这个方法会发送给主线程一个遍历调度的"消息",最终会调用ViewRootImpl.performTraversals方法,从这个方法开始,View会真正进入绘制的过程。
view的整体绘制流程可分为以下三个阶段:
这个阶段的目的是计算出控件树中的各个控件要显示的尺寸,measure的起点是MeasureHierarchy方法,方法源码如下:
private boolean measureHierarchy(final View host, final WindowManager.LayoutParams lp, final Resources res,final int desiredWindowWidth, final int desiredWindowHeight) {// 传入的desiredWindowXxx为窗口尺寸int childWidthMeasureSpec;int childHeightMeasureSpec;boolean windowSizeMayChange = false;. . .boolean goodMeasure = false;if (!goodMeasure) {childWidthMeasureSpec = getRootMeasureSpec(desiredWindowWidth, lp.width);childHeightMeasureSpec = getRootMeasureSpec(desiredWindowHeight, lp.height);performMeasure(childWidthMeasureSpec, childHeightMeasureSpec);//这是重点if (mWidth != host.getMeasuredWidth() || mHeight != host.getMeasuredHeight()) {windowSizeMayChange = true;}}return windowSizeMayChange;
}
上面的方法使用getRootMeasureSpec方法获取MeasureSpec,这个根MeasureSpec代表了对根DecorView窗口宽高的约束,在讲述measure之前,我们需要先了解几个测量的基础知识点,之后的实例才能看懂
MeasureSpec
与view的measure方法打交道,一定会遇到MeasureSpec这个拦路虎,那么MeasureSpec是什么?翻译过来就是测量参数或者是测量规格,官方文档对它的说明是:“一个MeasureSpec封装了从父容器传递给子容器的布局要求”,传递!!换句更准确的话说,这个MeasureSpec是(子view自身LayoutParams参数,其实就是我们在xml写的时候设置的layout_width和layout_height 转化而来的)和(父容器对子View的布局约束MeasureSpec)通过简单的计算得出的一个针对子View的测量要求,这个测量要求就是MeasureSpec。
大家都知道MeasureSpec是一个32位的整数,由SpecMode和SpecSize组成,前2位是mode,后30位是size,SpecMode有三种模式:
private void performMeasure(int childWidthMeasureSpec, int childHeightMeasureSpec) {. . .try {mView.measure(childWidthMeasureSpec, childHeightMeasureSpec);} finally {. . .}
}
当前我们是在测量根部局DecorView尺寸,上面的mView就是DecorView,而DecorView是一个FrameLayout,所以这个measure方法调用会转向FrameLayout中的measure,这个方法的源码如下:
/*** 调用这个方法来算出一个View应该为多大。参数为父View对其宽高的约束信息。* 实际的测量工作在onMeasure()方法中进行*/
public final void measure(int widthMeasureSpec, int heightMeasureSpec) {. . .// 判断是否需要重新布局// 若mPrivateFlags中包含PFLAG_FORCE_LAYOUT标记,则强制重新布局// 比如调用View.requestLayout()会在mPrivateFlags中加入此标记final boolean forceLayout = (mPrivateFlags & PFLAG_FORCE_LAYOUT) == PFLAG_FORCE_LAYOUT;final boolean specChanged = widthMeasureSpec != mOldWidthMeasureSpec|| heightMeasureSpec != mOldHeightMeasureSpec;final boolean isSpecExactly = MeasureSpec.getMode(widthMeasureSpec) == MeasureSpec.EXACTLY&& MeasureSpec.getMode(heightMeasureSpec) == MeasureSpec.EXACTLY;final boolean matchesSpecSize = getMeasuredWidth() == MeasureSpec.getSize(widthMeasureSpec)&& getMeasuredHeight() == MeasureSpec.getSize(heightMeasureSpec);final boolean needsLayout = specChanged&& (sAlwaysRemeasureExactly || !isSpecExactly || !matchesSpecSize);// 需要重新布局 if (forceLayout || needsLayout) {. . .// 先尝试从缓从中获取,若forceLayout为true或是缓存中不存在或是// 忽略缓存,则调用onMeasure()重新进行测量工作int cacheIndex = forceLayout ? -1 : mMeasureCache.indexOfKey(key);if (cacheIndex < 0 || sIgnoreMeasureCache) {// measure ourselves, this should set the measured dimension flag backonMeasure(widthMeasureSpec, heightMeasureSpec);. . .} else {// 缓存命中,直接从缓存中取值即可,不必再测量long value = mMeasureCache.valueAt(cacheIndex);// Casting a long to int drops the high 32 bits, no mask neededsetMeasuredDimensionRaw((int) (value >> 32), (int) value);. . .}. . .}mOldWidthMeasureSpec = widthMeasureSpec;mOldHeightMeasureSpec = heightMeasureSpec;mMeasureCache.put(key, ((long) mMeasuredWidth) << 32 |(long) mMeasuredHeight & 0xffffffffL); // suppress sign extension
}
从measure()方法的源码中我们可以知道,只有以下两种情况之一,才会进行实际的测量工作:
forceLayout为true:这表示强制重新布局,可以通过View.requestLayout()来实现;
needsLayout为true,这需要specChanged为true(表示本次传入的MeasureSpec与上次传入的不同),并且以下三个条件之一成立:sAlwaysRemeasureExactly为true: 该变量默认为false;isSpecExactly为false: 若父View对子View提出了精确的宽高约束,则该变量为true,否则为falsematchesSpecSize为false: 表示父View的宽高尺寸要求与上次测量的结果不同
对于decorView来说,实际执行测量工作的是FrameLayout的onMeasure()方法,该方法的源码如下:
@Override
protected void onMeasure(int widthMeasureSpec, int heightMeasureSpec) {int count = getChildCount();. . .int maxHeight = 0;int maxWidth = 0;int childState = 0;for (int i = 0; i < count; i++) {final View child = getChildAt(i);if (mMeasureAllChildren || child.getVisibility() != GONE) {measureChildWithMargins(child, widthMeasureSpec, 0, heightMeasureSpec, 0);final LayoutParams lp = (LayoutParams) child.getLayoutParams();maxWidth = Math.max(maxWidth,child.getMeasuredWidth() + lp.leftMargin + lp.rightMargin);maxHeight = Math.max(maxHeight,child.getMeasuredHeight() + lp.topMargin + lp.bottomMargin);childState = combineMeasuredStates(childState, child.getMeasuredState());. . .}}// Account for padding toomaxWidth += getPaddingLeftWithForeground() + getPaddingRightWithForeground();maxHeight += getPaddingTopWithForeground() + getPaddingBottomWithForeground();// Check against our minimum height and widthmaxHeight = Math.max(maxHeight, getSuggestedMinimumHeight());maxWidth = Math.max(maxWidth, getSuggestedMinimumWidth());// Check against our foreground's minimum height and widthfinal Drawable drawable = getForeground();if (drawable != null) {maxHeight = Math.max(maxHeight, drawable.getMinimumHeight());maxWidth = Math.max(maxWidth, drawable.getMinimumWidth());}setMeasuredDimension(resolveSizeAndState(maxWidth, widthMeasureSpec, childState),resolveSizeAndState(maxHeight, heightMeasureSpec,childState << MEASURED_HEIGHT_STATE_SHIFT));. . .
}
FrameLayout是ViewGroup的子类,父View的测量过程是先去测量子View,遍历测量完每一个子View后再去测量自己,通过getChildAt(i)取到每一个子View,然后上面的measureChildWithMargin方法就是去测量子View尺寸的,我们来分析一下是怎么测量的,看源码:
protected void measureChildWithMargins(View child, int parentWidthMeasureSpec, int widthUsed, int parentHeightMeasureSpec, int heightUsed) {// 子View的LayoutParams,你在xml的layout_width和layout_height,
// layout_xxx的值最后都会封装到这个个LayoutParams。
final MarginLayoutParams lp = (MarginLayoutParams) child.getLayoutParams();  //根据父View的测量规格和父View自己的Padding,
//还有子View的Margin和已经用掉的空间大小(widthUsed),就能算出子View的MeasureSpec,具体计算过程看getChildMeasureSpec方法。
final int childWidthMeasureSpec = getChildMeasureSpec(parentWidthMeasureSpec,
mPaddingLeft + mPaddingRight + lp.leftMargin + lp.rightMargin + widthUsed, lp.width);   final int childHeightMeasureSpec = getChildMeasureSpec(parentHeightMeasureSpec,
mPaddingTop + mPaddingBottom + lp.topMargin + lp.bottomMargin  + heightUsed, lp.height); //通过父View的MeasureSpec和子View的自己LayoutParams的计算,算出子View的MeasureSpec,然后父容器传递给子容器的
// 然后让子View用这个MeasureSpec(一个测量要求,比如不能超过多大)去测量自己,如果子View是ViewGroup 那还会递归往下测量。
child.measure(childWidthMeasureSpec, childHeightMeasureSpec);}// spec参数   表示父View的MeasureSpec
// padding参数    父View的Padding+子View的Margin,父View的大小减去这些边距,才能精确算出
//               子View的MeasureSpec的size
// childDimension参数  表示该子View内部LayoutParams属性的值(lp.width或者lp.height)
//                    可以是wrap_content、match_parent、一个精确指(an exactly size),
public static int getChildMeasureSpec(int spec, int padding, int childDimension) { int specMode = MeasureSpec.getMode(spec);  //获得父View的mode int specSize = MeasureSpec.getSize(spec);  //获得父View的大小 //父View的大小-自己的Padding+子View的Margin,得到值才是子View的大小。int size = Math.max(0, specSize - padding);  int resultSize = 0;    //初始化值,最后通过这个两个值生成子View的MeasureSpecint resultMode = 0;    //初始化值,最后通过这个两个值生成子View的MeasureSpecswitch (specMode) { // Parent has imposed an exact size on us //1、父View是EXACTLY的 ! case MeasureSpec.EXACTLY:  //1.1、子View的width或height是个精确值 (an exactly size) if (childDimension >= 0) {           resultSize = childDimension;         //size为精确值 resultMode = MeasureSpec.EXACTLY;    //mode为 EXACTLY 。 }  //1.2、子View的width或height为 MATCH_PARENT/FILL_PARENT  else if (childDimension == LayoutParams.MATCH_PARENT) { // Child wants to be our size. So be it. resultSize = size;                   //size为父视图大小 resultMode = MeasureSpec.EXACTLY;    //mode为 EXACTLY 。 }  //1.3、子View的width或height为 WRAP_CONTENT else if (childDimension == LayoutParams.WRAP_CONTENT) { // Child wants to determine its own size. It can't be // bigger than us. resultSize = size;                   //size为父视图大小 resultMode = MeasureSpec.AT_MOST;    //mode为AT_MOST 。 } break; // Parent has imposed a maximum size on us //2、父View是AT_MOST的 !     case MeasureSpec.AT_MOST: //2.1、子View的width或height是个精确值 (an exactly size) if (childDimension >= 0) { // Child wants a specific size... so be it resultSize = childDimension;        //size为精确值 resultMode = MeasureSpec.EXACTLY;   //mode为 EXACTLY 。 } //2.2、子View的width或height为 MATCH_PARENT/FILL_PARENT else if (childDimension == LayoutParams.MATCH_PARENT) { // Child wants to be our size, but our size is not fixed. // Constrain child to not be bigger than us. resultSize = size;                  //size为父视图大小 resultMode = MeasureSpec.AT_MOST;   //mode为AT_MOST } //2.3、子View的width或height为 WRAP_CONTENT else if (childDimension == LayoutParams.WRAP_CONTENT) { // Child wants to determine its own size. It can't be // bigger than us. resultSize = size;                  //size为父视图大小 resultMode = MeasureSpec.AT_MOST;   //mode为AT_MOST } break; // Parent asked to see how big we want to be //3、父View是UNSPECIFIED的 ! case MeasureSpec.UNSPECIFIED: //3.1、子View的width或height是个精确值 (an exactly size) if (childDimension >= 0) { // Child wants a specific size... let him have it resultSize = childDimension;        //size为精确值 resultMode = MeasureSpec.EXACTLY;   //mode为 EXACTLY } //3.2、子View的width或height为 MATCH_PARENT/FILL_PARENT else if (childDimension == LayoutParams.MATCH_PARENT) { // Child wants to be our size... find out how big it should // be resultSize = 0;                        //size为0! ,其值未定 resultMode = MeasureSpec.UNSPECIFIED;  //mode为 UNSPECIFIED }  //3.3、子View的width或height为 WRAP_CONTENT else if (childDimension == LayoutParams.WRAP_CONTENT) { // Child wants to determine its own size.... find out how // big it should be resultSize = 0;                        //size为0! ,其值未定 resultMode = MeasureSpec.UNSPECIFIED;  //mode为 UNSPECIFIED } break; } //根据上面逻辑条件获取的mode和size构建MeasureSpec对象。 return MeasureSpec.makeMeasureSpec(resultSize, resultMode);
}
代码很多,但是原理并不复杂:
1、如果我们在xml 的layout_width或者layout_height 把值都写死,那么上述的测量完全就不需要了,之所以有上述的代码逻辑,是因为match_parent是父容器多大我(当前这个子View)就多大,wrap_content是自己实际多大就显示多大,都没有确切的定下来尺寸,开发者在xml布局文件中声明这么一个属性非常容易,Android系统在默默的为我们实现了很多的功能,它要帮助我们计算出match_parent、wrap_content实际上是多大,这个计算过程呢,就是每一层计算出来的MeasureSpec不断地往子View传递,然后结合子View的LayoutParams共同计算出子View的MeasureSpec,再递归传递给下层的子View,不断计算每个View的MeasureSpec,子View有了MeasureSpec才能更测量自己和自己的子View。
2、上述代码如果这么来理解就简单了
如果父View的MeasureSpec 是EXACTLY,说明父View的大小是确切的,(确切的意思很好理解,如果一个View的MeasureSpec 是EXACTLY,那么它的size 是多大,最后展示到屏幕就一定是那么大)。
①、如果子View 的layout_xxxx是MATCH_PARENT,父View的大小是确切,子View的大小又MATCH_PARENT(充满整个父View),那么子View的大小肯定是确切的,而且大小值就是父View的size。所以子View的size=父View的size,mode=EXACTLY
②、如果子View 的layout_xxxx是WRAP_CONTENT,也就是子View的大小是根据自己的content 来决定的,但是子View的毕竟是子View,大小不能超过父View的大小,但是子View的是WRAP_CONTENT,我们还不知道具体子View的大小是多少,要等到child.measure(childWidthMeasureSpec, childHeightMeasureSpec) 调用的时候才去真正测量子View 自己content的大小(比如TextView wrap_content 的时候你要测量TextView content 的大小,也就是字符占用的大小,这个测量就是在child.measure(childWidthMeasureSpec, childHeightMeasureSpec)的时候,才能测出字符的大小,MeasureSpec 的意思就是假设你字符100px,但是MeasureSpec 要求最大的只能50px,这时候就要截掉了)。通过上述描述,子View MeasureSpec mode的应该是AT_MOST,而size 暂定父View的 size,表示的意思就是子View的大小没有不确切的值,子View的大小最大为父View的大小,不能超过父View的大小(这就是AT_MOST 的意思),然后这个MeasureSpec 做为子View measure方法 的参数,做为子View的大小的约束或者说是要求,有了这个MeasureSpec子View再实现自己的测量。
③、如果如果子View 的layout_xxxx是确定的值(200dp),那么就更简单了,不管你父View的mode和size是什么,我都写死了就是200dp,那么控件最后展示就是就是200dp,不管我的父View有多大,也不管我自己的content 有多大,反正我就是这么大,所以这种情况MeasureSpec 的mode = EXACTLY 大小size=你在layout_xxxx 填的那个值。
如果父View的MeasureSpec 是AT_MOST,说明父View的大小是不确定,最大的大小是MeasureSpec 的size值,不能超过这个值。
①、如果子View 的layout_xxxx是MATCH_PARENT,父View的大小是不确定(只知道最大只能多大),子View的大小MATCH_PARENT(充满整个父View),那么子View你即使充满父容器,你的大小也是不确定的,父View自己都确定不了自己的大小,你MATCH_PARENT你的大小肯定也不能确定的,所以子View的mode=AT_MOST,size=父View的size,也就是你在布局虽然写的是MATCH_PARENT,但是由于你的父容器自己的大小不确定,导致子View的大小也不确定,只知道最大就是父View的大小。
②、如果子View 的layout_xxxx是WRAP_CONTENT,父View的大小是不确定(只知道最大只能多大),子View又是WRAP_CONTENT,那么在子View的Content没算出大小之前,子View的大小最大就是父View的大小,所以子View MeasureSpec mode的就是AT_MOST,而size 暂定父View的 size。
③、如果如果子View 的layout_xxxx是确定的值(200dp),同上,写多少就是多少,改变不了的。
如果父View的MeasureSpec 是UNSPECIFIED(未指定),表示没有任何束缚和约束,不像AT_MOST表示最大只能多大,不也像EXACTLY表示父View确定的大小,子View可以得到任意想要的大小,不受约束
①、如果子View 的layout_xxxx是MATCH_PARENT,因为父View的MeasureSpec是UNSPECIFIED,父View自己的大小并没有任何约束和要求,
那么对于子View来说无论是WRAP_CONTENT还是MATCH_PARENT,子View也是没有任何束缚的,想多大就多大,没有不能超过多少的要求,一旦没有任何要求和约束,size的值就没有任何意义了,所以一般都直接设置成0
②、同上…
③、如果如果子View 的layout_xxxx是确定的值(200dp),同上,写多少就是多少,改变不了的(记住,只有设置的确切的值,那么无论怎么测量,大小都是不变的,都是你写的那个值)
到此为止,我们应该对MeasureSpec 和三种模式、还有WRAP_CONTENT和MATCH_PARENT有一定的了解了
在measureChildWithMargins()方法中,获取了知道子View测量的MeasureSpec后,接下来就要调用child.measure()方法,并把获取到的childMeasureSpec传入。这时便又会调用onMeasure()方法,若此时的子View为ViewGroup的子类,便会调用相应容器类的onMeasure()方法,其他容器View的onMeasure()方法与FrameLayout的onMeasure()方法执行过程相似。
下面会我们回到FrameLayout的onMeasure()方法,当递归地执行完所有子View的测量工作后,会调用resolveSizeAndState()方法来根据之前的测量结果确定最终对FrameLayout的测量结果并存储起来。View类的resolveSizeAndState()方法的源码如下:
public static int resolveSizeAndState(int size, int measureSpec, int childMeasuredState) {final int specMode = MeasureSpec.getMode(measureSpec);final int specSize = MeasureSpec.getSize(measureSpec);final int result;switch (specMode) {case MeasureSpec.AT_MOST:if (specSize < size) {// 父View给定的最大尺寸小于完全显示内容所需尺寸// 则在测量结果上加上MEASURED_STATE_TOO_SMALLresult = specSize | MEASURED_STATE_TOO_SMALL;} else {result = size;}break;case MeasureSpec.EXACTLY:// 若specMode为EXACTLY,则不考虑size,result直接赋值为specSizeresult = specSize;break;case MeasureSpec.UNSPECIFIED:default:result = size;}return result | (childMeasuredState & MEASURED_STATE_MASK);}
如果是View的测量过程主要是在onMeasure()方法
打开View的源码,找到measure方法,这个方法代码不少,但是测量工作都是在onMeasure()做的,measure方法是final的所以这个方法也不可重写,如果想自定义View的测量,你应该去重写onMeasure()方法
public final void measure(int widthMeasureSpec, int heightMeasureSpec) {......onMeasure(widthMeasureSpec,heightMeasureSpec);.....
}
View的onMeasure 的默认实现
protected void onMeasure(int widthMeasureSpec, int heightMeasureSpec) {   setMeasuredDimension(getDefaultSize(getSuggestedMinimumWidth(), widthMeasureSpec),           getDefaultSize(getSuggestedMinimumHeight(), heightMeasureSpec));
}
View的onMeasure方法默认实现很简单,就是调用setMeasuredDimension(),setMeasuredDimension()可以简单理解就是给mMeasuredWidth和mMeasuredHeight设值,如果这两个值一旦设置了,那么意味着对于这个View的测量结束了,这个View的宽高已经有测量的结果出来了。如果我们想设定某个View的高宽,完全可以直接通过setMeasuredDimension(100,200)来设置死它的高宽(不建议),但是setMeasuredDimension方法必须在onMeasure方法中调用,不然会抛异常。对于普通View(非ViewgGroup)来说,只需完成自身的测量工作即可。以上代码中通过setMeasuredDimension()方法设置测量的结果,具体来说是以getDefaultSize()方法的返回值来作为测量结果。getDefaultSize()方法的源码如下:
public static int getDefaultSize(int size, int measureSpec) {int result = size;int specMode = MeasureSpec.getMode(measureSpec);int specSize = MeasureSpec.getSize(measureSpec);switch (specMode) {case MeasureSpec.UNSPECIFIED:result = size;break;case MeasureSpec.AT_MOST:case MeasureSpec.EXACTLY:result = specSize;break;}return result;
}
看上述的代码,对于MeasureSpec的mode,AT_MOST和EXACTLY返回的是相同的都是specSize,所以当我们在xml布局文件中设置View的宽高为wrap_content时,与设置成match_parent是一样的,都是充满父布局,getDefaultSize的第一个参数size等于getSuggestedMinimumXXXX返回的的值(建议的最小宽度和高度),而建议的最小宽度和高度都是由View的Background尺寸与通过设置View的minXXX属性共同决定的,这个size可以理解为View的默认长度,而第二个参数measureSpec,是父View传给自己的MeasureSpec,这个measureSpec是通过测量计算出来的,具体的计算测量过程前面在讲解MeasureSpec已经讲得比较清楚了(是有父View的MeasureSpec和子View自己的LayoutParams 共同决定的)只要这个测试的mode不是UNSPECIFIED(未确定的),那么默认的就会用这个测量的数值当做View的高度。
对于View默认是测量很简单,大部分情况就是拿计算出来的MeasureSpec的size 当做最终测量的大小。而对于其他的一些View的派生类,如TextView、Button、ImageView等,它们的onMeasure方法系统了都做了重写,不会这么简单直接拿 MeasureSpec 的size来当大小,而去会先去测量字符或者图片的高度等,然后拿到View本身content这个高度(字符高度等),如果MeasureSpec是AT_MOST,而且View本身content的高度不超出MeasureSpec的size,那么可以直接用View本身content的高度(字符高度等),而不是像View.java 直接用MeasureSpec的size做为View的大小。
--------------------------------------------这是一条华丽的分割线--------------------------------------------
下面我们通过一个xml布局的例子来说明一个布局文件到底是怎么测量出来的,先来看ViewTree的图片
上面的图片用xml布局文件写出来是这样的:
<?xml version="1.0" encoding="utf-8"?>
<LinearLayout  xmlns:android="http://schemas.android.com/apk/res/android"   android:id="@+id/linear"android:layout_width="match_parent"   android:layout_height="wrap_content"   android:layout_marginTop="50dp"   android:background="@android:color/holo_blue_dark"   android:paddingBottom="70dp"   android:orientation="vertical">   <TextView       android:id="@+id/text"      android:layout_width="match_parent"    android:layout_height="wrap_content" android:background="@color/material_blue_grey_800"      android:text="TextView"       android:textColor="@android:color/white"       android:textSize="20sp" />   <View      android:id="@+id/view"      android:layout_width="match_parent"android:layout_height="150dp"   android:background="@android:color/holo_green_dark" />
</LinearLayout>
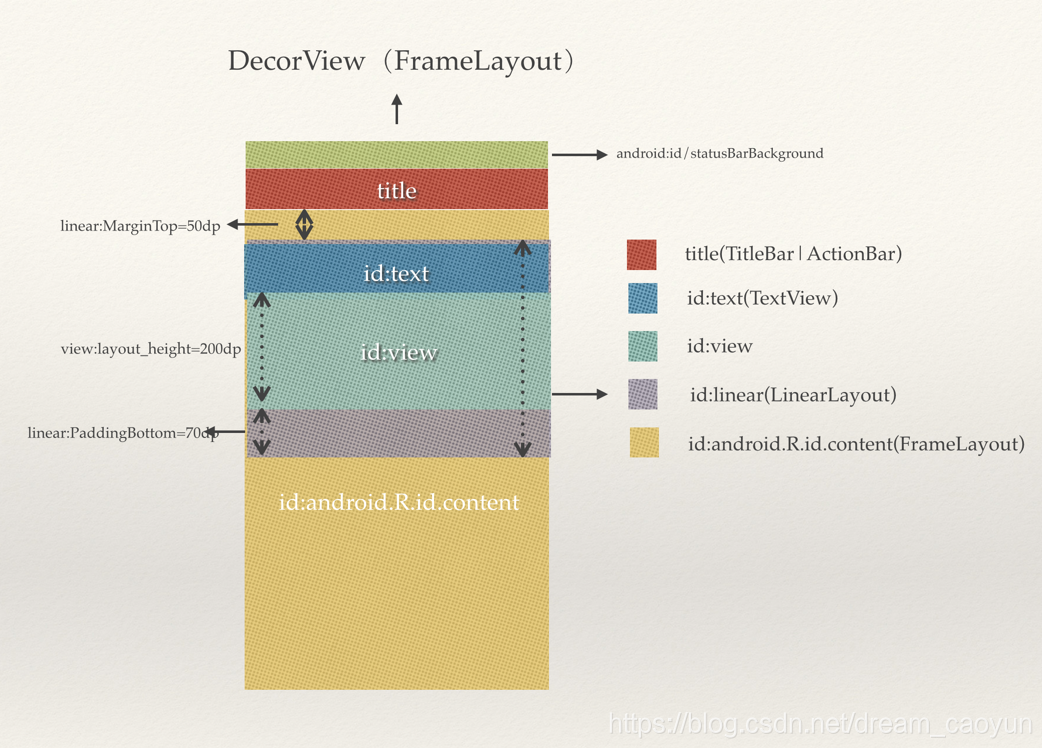
整个图是一个DecorView,DecorView可以理解成整个页面的根View,DecorView是一个FrameLayout,包含两个子View,一个id=statusBarBackground的View和一个是LineaLayout,id=statusBarBackground的View,我们可以先不管(我也不是特别懂这个View,应该就是statusBar的设置背景的一个控件,方便设置statusBar的背景),而这个LinearLayout比较重要,它包含一个title和一个content,title很好理解其实就是TitleBar或者ActionBar,content 就更简单了,setContentView()方法你应该用过吧,android.R.id.content 你应该听过吧,没错就是它,content是一个FrameLayout,你写的页面布局通过setContentView加进来就成了content的直接子View。
整个View的布局图如下:
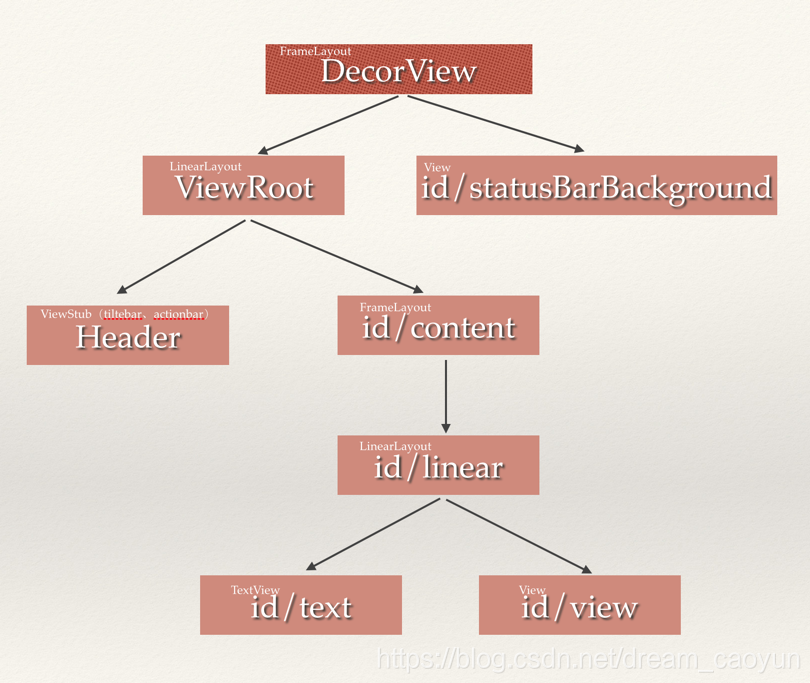
注:
1、 header的是个ViewStub,用来惰性加载ActionBar,为了便于分析整个测量过程,我把Theme设成NoActionBar,避免ActionBar 相关的measure干扰整个过程,这样可以忽略掉ActionBar 的测量,在调试代码更清晰。
2、包含Header(ActionBar)和id/content 的那个父View,我不知道叫什么名字好,我们姑且叫它ViewRoot(看上图),它是垂直的LinearLayout,放着整个页面除statusBar 的之外所有的东西,叫它ViewRoot 应该还ok,一个代号而已。
这张图在下面分析measure,会经常用到,主要用于了解递归的时候view 的measure顺序
既然我们知道整个View的Root是DecorView,那么View的绘制的入口是由ViewRootImpl的performTraversals方法来发起Measure,Layout,Draw等流程的。
我们来看下ViewRootImpl的performTraversals 方法:
private void performTraversals() {
......
int childWidthMeasureSpec = getRootMeasureSpec(mWidth, lp.width);
int childHeightMeasureSpec = getRootMeasureSpec(mHeight, lp.height);
......
mView.measure(childWidthMeasureSpec, childHeightMeasureSpec);
......
mView.layout(0, 0, mView.getMeasuredWidth(), mView.getMeasuredHeight());
......
mView.draw(canvas);
......
}private static int getRootMeasureSpec(int windowSize, int rootDimension) {int measureSpec;switch (rootDimension) {case ViewGroup.LayoutParams.MATCH_PARENT:// Window can't resize. Force root view to be windowSize.  measureSpec = MeasureSpec.makeMeasureSpec(windowSize,MeasureSpec.EXACTLY);break;......}return measureSpec;
}
performTraversals 中我们看到的mView其实就是DecorView,View的绘制从DecorView开始, 在mView.measure()的时候调用getRootMeasureSpec获得两个MeasureSpec做为参数,getRootMeasureSpec的两个参数(mWidth, lp.width)mWith和mHeight 是屏幕的宽度和高度, lp是WindowManager.LayoutParams,它的lp.width和lp.height的默认值是MATCH_PARENT,所以通过getRootMeasureSpec 生成的测量规格MeasureSpec 的mode是MATCH_PARENT ,size是屏幕的高宽。
因为DecorView 是一个FrameLayout 那么接下来会进入FrameLayout 的measure方法,measure的两个参数就是刚才getRootMeasureSpec的生成的两个MeasureSpec,DecorView的测量开始了。
首先是DecorView 的 MeasureSpec ,根据上面的分析DecorView 的 MeasureSpec是Windows传过来的,我们画出DecorView 的MeasureSpec 图:
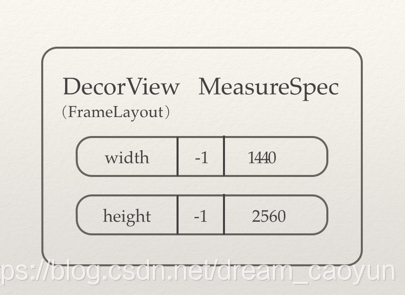
注:
1、-1 代表的是EXACTLY,-2 是AT_MOST
2、由于屏幕的像素是1440x2560,所以DecorView 的MeasureSpec的size 对应于这两个值
那么接下来在FrameLayout 的onMeasure()方法DecorView开始for循环测量自己的子View,测量完所有的子View再来测量自己,由下图可知,接下来要测量ViewRoot的大小
//FrameLayout 的测量
protected void onMeasure(int widthMeasureSpec, int heightMeasureSpec) {
....
int maxHeight = 0;
int maxWidth = 0;
int childState = 0;
for (int i = 0; i < count; i++) {   final View child = getChildAt(i);   if (mMeasureAllChildren || child.getVisibility() != GONE) {  // 遍历自己的子View,只要不是GONE的都会参与测量,measureChildWithMargins方法在最上面// 的源码已经讲过了,如果忘了回头去看看,基本思想就是父View把自己当MeasureSpec// 传给子View结合子View自己的LayoutParams 算出子View 的MeasureSpec,然后继续往下穿,// 传递叶子节点,叶子节点没有子View,只要负责测量自己就好了。measureChildWithMargins(child, widthMeasureSpec, 0, heightMeasureSpec, 0);     ........}
}
....
}
DecorView 测量ViewRoot 的时候把自己的widthMeasureSpec和heightMeasureSpec传进去了,接下来要去看measureChildWithMargins的源码
protected void measureChildWithMargins(View child, int parentWidthMeasureSpec, int widthUsed, int parentHeightMeasureSpec, int heightUsed) {final MarginLayoutParams lp = (MarginLayoutParams) child.getLayoutParams();  final int childWidthMeasureSpec = getChildMeasureSpec(parentWidthMeasureSpec,
mPaddingLeft + mPaddingRight + lp.leftMargin + lp.rightMargin + widthUsed, lp.width);   final int childHeightMeasureSpec = getChildMeasureSpec(parentHeightMeasureSpec,
mPaddingTop + mPaddingBottom + lp.topMargin + lp.bottomMargin  + heightUsed, lp.height); child.measure(childWidthMeasureSpec, childHeightMeasureSpec);
}
ViewRoot 是系统的View,它的LayoutParams默认都是match_parent,根据我们文章最开始MeasureSpec 的计算规则,ViewRoot 的MeasureSpec mode应该等于EXACTLY(DecorView MeasureSpec 的mode是EXACTLY,ViewRoot的layoutparams 是match_parent),size 也等于DecorView的size,所以ViewRoot的MeasureSpec图如下:
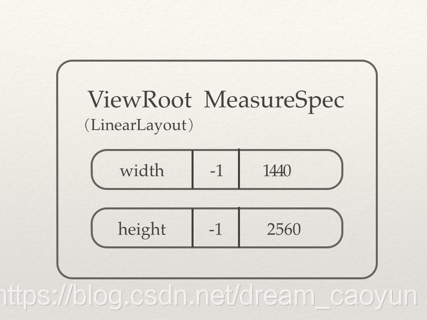
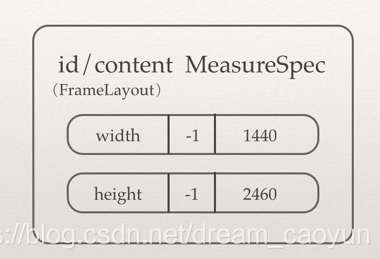
算出ViewRoot的MeasureSpec 之后,开始调用ViewRoot.measure 方法去测量ViewRoot的大小,然而ViewRoot是一个LinearLayout ,ViewRoot.measure最终会执行的LinearLayout 的onMeasure 方法,LinearLayout 的onMeasure 方法又开始逐个测量它的子View,上面的measureChildWithMargins方法又会被调用,那么根据View的层级图,接下来测量的是header(ViewStub),由于header的Gone,所以直接跳过不做测量工作,所以接下来轮到ViewRoot的第二个child content(android.R.id.content),我们要算出这个content 的MeasureSpec,所以又要拿ViewRoot 的MeasureSpec 和 android.R.id.content的LayoutParams 做计算了,计算过程就是调用getChildMeasureSpec的方法,

protected void measureChildWithMargins(View child, int parentWidthMeasureSpec, int widthUsed, int parentHeightMeasureSpec, int heightUsed) {.....final int childHeightMeasureSpec = getChildMeasureSpec(parentHeightMeasureSpec,
mPaddingTop + mPaddingBottom + lp.topMargin + lp.bottomMargin  + heightUsed, lp.height); ....
}public static int getChildMeasureSpec(int spec, int padding, int childDimension) { int specMode = MeasureSpec.getMode(spec);  //获得父View的mode int specSize = MeasureSpec.getSize(spec);  //获得父View的大小 int size = Math.max(0, specSize - padding); //父View的大小-自己的Padding+子View的Margin,得到值才是子View可能的最大值。 .....
}
由上面的代码
int size = Math.max(0, specSize - padding);
而 padding=mPaddingTop + mPaddingBottom + lp.topMargin + lp.bottomMargin + heightUsed
算出android.R.id.content 的MeasureSpec 的size
由于ViewRoot 的mPaddingBottom=100px(这个可能和状态栏的高度有关,我们测量的最后会发现id/statusBarBackground的View的高度刚好等于100px,ViewRoot 是系统的View的它的Padding 我们没法改变,所以计算出来Content(android.R.id.content) 的MeasureSpec 的高度少了100px ,它的宽高的mode 根据算出来也是EXACTLY(ViewRoot 是EXACTLY和android.R.id.content 是match_parent)。所以Content(android.R.id.content)的MeasureSpec 如下(高度少了100px):
Content(android.R.id.content) 是FrameLayout,递归调用开始准备计算id/linear的MeasureSpec,我们先给出结果:

图中有两个要注意的地方:
1、id/linear的heightMeasureSpec 的mode=AT_MOST,因为id/linear 的LayoutParams 的layout_height=“wrap_content”
2、id/linear的heightMeasureSpec 的size 少了200px, 由上面的代码
padding=mPaddingTop + mPaddingBottom + lp.topMargin + lp.bottomMargin + heightUsed;
int size = Math.max(0, specSize - padding);
由于id/linear 的 android:layout_marginTop=“50dp” 使得lp.topMargin=200px (本设备的density=4,px=4*pd),在计算后id/linear的heightMeasureSpec 的size 少了200px。(布局代码前面已给出,可自行查看id/linear 控件xml中设置的属性)
linear.measure接着往下算linear的子View的的MeasureSpec,看下View 层级图,往下走应该是id/text,接下来是计算id/text的MeasureSpec,直接看图,mode=AT_MOST ,size 少了280,别问我为什么 …specSize - padding.

算出id/text 的MeasureSpec 后,接下来text.measure(childWidthMeasureSpec, childHeightMeasureSpec);准备测量id/text 的高宽,这时候已经到底了,id/text是TextView,已经没有子类了,这时候跳到TextView的onMeasure方法了。TextView 拿着刚才计算出来的heightMeasureSpec(mode=AT_MOST,size=1980),这个就是对TextView的高度和宽度的约束,进到TextView 的onMeasure(widthMeasureSpec,heightMeasureSpec) 方法,在onMeasure 方法执行调试过程中,我们发现下面的代码:
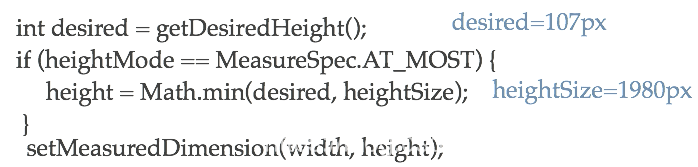
TextView字符的高度(也就是TextView的content高度[wrap_content])测出来=107px,107px 并没有超过1980px(允许的最大高度),所以实际测量出来TextView的高度是107px。
最终算出id/text 的mMeasureWidth=1440px,mMeasureHeight=107px。
<?xml version="1.0" encoding="utf-8"?>
<LinearLayout  xmlns:android="http://schemas.android.com/apk/res/android"   android:id="@+id/linear"android:layout_width="match_parent"   android:layout_height="wrap_content"   android:layout_marginTop="50dp"   android:background="@android:color/holo_blue_dark"   android:paddingBottom="70dp"   android:orientation="vertical">   <TextView       android:id="@+id/text"      android:layout_width="match_parent"    android:layout_height="wrap_content" android:background="@color/material_blue_grey_800"      android:text="TextView"       android:textColor="@android:color/white"       android:textSize="20sp" />   <View      android:id="@+id/view"      android:layout_width="match_parent"android:layout_height="150dp"   android:background="@android:color/holo_green_dark" />
</LinearLayout>
TextView的高度已经测量出来了,接下来测量id/linear的第二个child(id/view),同样的原理测出id/view的MeasureSpec.

d/view的MeasureSpec 计算出来后,调用view.measure(childWidthMeasureSpec, childHeightMeasureSpec)的测量id/view的高宽,之前已经说过View measure的默认实现是
protected void onMeasure(int widthMeasureSpec, int heightMeasureSpec) {   setMeasuredDimension(getDefaultSize(getSuggestedMinimumWidth(), widthMeasureSpec),           getDefaultSize(getSuggestedMinimumHeight(), heightMeasureSpec));
}
最终算出id/view的mMeasureWidth=1440px,mMeasureHeight=600px。
id/linear 的子View的高度都计算完毕了,接下来id/linear就通过所有子View的测量结果计算自己的高宽,id/linear是LinearLayout,所有它的高度计算简单理解就是子View的高度的累积+自己的Padding.
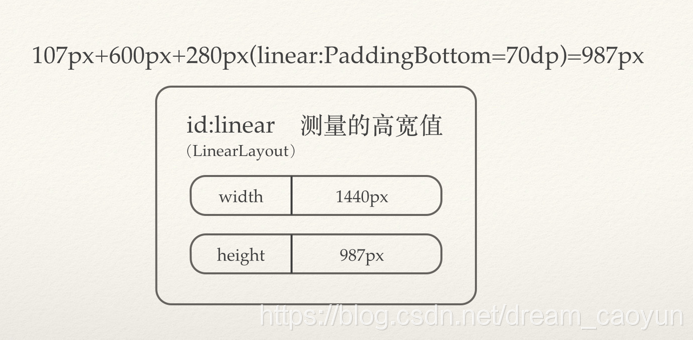
最终算出id/linear的mMeasureWidth=1440px,mMeasureHeight=987px。
最终算出id/linear出来后,id/content 就要根据它唯一的子View id/linear 的测量结果和自己的之前算出的MeasureSpec一起来测量自己的结果,具体计算的逻辑去看FrameLayout onMeasure 函数的计算过程。以此类推,接下来测量ViewRoot,然后再测量id/statusBarBackground,虽然不知道id/statusBarBackground 是什么,但是调试的过程中,测出的它的高度=100px, 和 id/content 的paddingTop 刚好相等。在最后测量DecorView 的高宽,最终整个测量过程结束。所有的View的大小测量完毕。所有的getMeasureWidth 和 getMeasureWidth 都已经有值了。Measure 分析到此为止
mView.measure(childWidthMeasureSpec, childHeightMeasureSpec);
......
mView.layout(0, 0, mView.getMeasuredWidth(), mView.getMeasuredHeight());
performTraversals 方法执行完mView.measure 计算出mMeasuredXXX后就开始执行layout 函数来确定View具体放在哪个位置,我们计算出来的View目前只知道view矩阵的大小,具体这个矩阵放在哪里,这就是layout 的工作了。layout的主要作用 :根据子视图的大小以及布局参数将View树放到合适的位置上。
既然是通过mView.layout(0, 0, mView.getMeasuredWidth(), mView.getMeasuredHeight()); 那我们来看下layout 函数做了什么,mView肯定是个ViewGroup,不会是View,我们直接看下ViewGroup 的layout函数
public final void layout(int l, int t, int r, int b) {   if (!mSuppressLayout && (mTransition == null || !mTransition.isChangingLayout())) {       if (mTransition != null) {           mTransition.layoutChange(this);       }      super.layout(l, t, r, b);   } else {       // record the fact that we noop'd it; request layout when transition finishes       mLayoutCalledWhileSuppressed = true;   }
}
代码可以看个大概,LayoutTransition用于处理增删子View控件的动画效果,我们不去管动画,这个函数是final,不能被重写的,所有的ViewGroup子类都会去调用它,layout的具体实现是super.layout(l,t,r,b),我们跳到View的layout源码中:
public final void layout(int l, int t, int r, int b) {.....//设置View位于父视图的坐标轴boolean changed = setFrame(l, t, r, b);//判断View的位置是否发生过变化,看有必要进行重新layout吗if (changed || (mPrivateFlags & LAYOUT_REQUIRED) == LAYOUT_REQUIRED) {if (ViewDebug.TRACE_HIERARCHY) {ViewDebug.trace(this, ViewDebug.HierarchyTraceType.ON_LAYOUT);}//调用onLayout(changed, l, t, r, b); 函数onLayout(changed, l, t, r, b);mPrivateFlags &= ~LAYOUT_REQUIRED;}mPrivateFlags &= ~FORCE_LAYOUT;.....}
1、setFrame(l, t, r, b) 可以理解为给mLeft 、mTop、mRight、mBottom赋值,然后基本就能确定View自己在父视图的位置了,这几个值构成的矩形区域就是该View显示的位置,这里的具体位置都是相对与父视图的位置。
2、回调onLayout,对于View来说,onLayout只是一个空实现,一般情况下我们也不需要重载该函数,而ViewGroup的onLayout是抽象方法,子类必须重写实现它,而重载onLayout的目的就是安排其children在父视图的具体位置,那么如何安排子View的具体位置呢?
nt childCount = getChildCount() ;for(int i=0 ;i<childCount ;i++){View child = getChildAt(i) ;//整个layout()过程就是个递归过程child.layout(l, t, r, b) ;}
代码很简单,就是遍历自己的孩子,然后调用 child.layout(l, t, r, b) ,给子view 通过setFrame(l, t, r, b) 确定位置,而重点是(l, t, r, b) 怎么计算出来的呢。还记得我们之前测量过程,测量出来的MeasuredWidth和MeasuredHeight吗?还记得你在xml 设置的Gravity吗?还有RelativeLayout 的其他参数吗,没错,就是这些参数和MeasuredHeight、MeasuredWidth 一起来确定子View在父视图的具体位置的。具体的计算过程大家可以看下最简单FrameLayout 的onLayout 函数的源码,每个不同的ViewGroup 的实现都不一样,这边不做具体分析了吧。
3、MeasuredWidth和MeasuredHeight这两个参数为layout过程提供了一个很重要的依据(如果不知道View的大小,你怎么固定四个点的位置呢),但是这两个参数也不是必须的,layout过程中的4个参数l, t, r, b完全可以由我们任意指定,而View的最终的布局位置和大小(mRight - mLeft=实际宽或者mBottom-mTop=实际高)完全由这4个参数决定,measure过程得到的mMeasuredWidth和mMeasuredHeight提供了视图大小测量的值,但我们完全可以不使用这两个值,所以measure过程并不是必须的。如果我们不使用这两个值,那么getMeasuredWidth() 和getWidth() 就很有可能不是同一个值,它们的计算是不一样的:
public final int getMeasuredWidth() { return mMeasuredWidth & MEASURED_SIZE_MASK; }
public final int getWidth() { return mRight - mLeft; }
layout 过程相对简单些
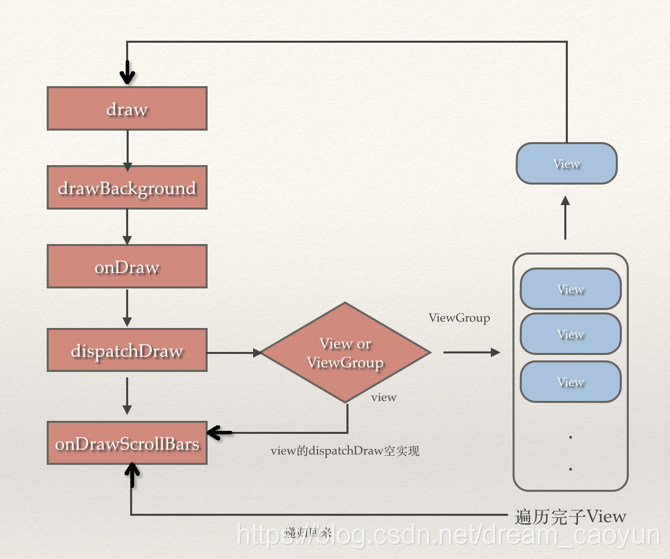
performTraversals 方法的下一步就是mView.draw(canvas); 因为View的draw 方法一般不去重写,官网文档也建议不要去重写draw 方法,所以下一步执行就是View.java的draw 方法,我们来看下源码:
public void draw(Canvas canvas) {.../** Draw traversal performs several drawing steps which must be executed* in the appropriate order:** 1. Draw the background* 2. If necessary, save the canvas' layers to prepare for fading* 3. Draw view's content* 4. Draw children* 5. If necessary, draw the fading edges and restore layers* 6. Draw decorations (scrollbars for instance)*/// Step 1, draw the background, if needed...background.draw(canvas);...// skip step 2 & 5 if possible (common case)...// Step 2, save the canvas' layers...if (solidColor == 0) {final int flags = Canvas.HAS_ALPHA_LAYER_SAVE_FLAG;if (drawTop) {canvas.saveLayer(left, top, right, top + length, null, flags);}...// Step 3, draw the contentif (!dirtyOpaque) onDraw(canvas);// Step 4, draw the childrendispatchDraw(canvas);// Step 5, draw the fade effect and restore layersif (drawTop) {matrix.setScale(1, fadeHeight * topFadeStrength);matrix.postTranslate(left, top);fade.setLocalMatrix(matrix);canvas.drawRect(left, top, right, top + length, p);}...// Step 6, draw decorations (scrollbars)onDrawScrollBars(canvas);}
注释写得比较清楚,一共分成6步,看到注释没有( // skip step 2 & 5 if possible (common case))除了2 和 5之外 我们一步一步来看:
1、第一步:背景绘制
看注释即可,不是重点
private void drawBackground(Canvas canvas) {Drawable final Drawable background = mBackground;......//mRight - mLeft, mBottom - mTop layout确定的四个点来设置背景的绘制区域if (mBackgroundSizeChanged) {background.setBounds(0, 0, mRight - mLeft, mBottom - mTop);  mBackgroundSizeChanged = false; rebuildOutline();}......//调用Drawable的draw() 把背景图片画到画布上background.draw(canvas);......
}
第三步,对View的内容进行绘制。
onDraw(canvas) 方法是view用来draw 自己的,具体如何绘制,颜色线条什么样式就需要子View自己去实现,View.java 的onDraw(canvas) 是空实现,ViewGroup 也没有实现,每个View的内容是各不相同的,所以需要由子类去实现具体逻辑。
第四步 对当前View的所有子View进行绘制
dispatchDraw(canvas)是用来绘制子View的,View.java 的dispatchDraw()方法是一个空方法,因为View没有子View,不需要实现dispatchDraw ()方法,ViewGroup就不一样了,它实现了dispatchDraw方法:
@Overrideprotected void dispatchDraw(Canvas canvas) {...if ((flags & FLAG_USE_CHILD_DRAWING_ORDER) == 0) {for (int i = 0; i < count; i++) {final View child = children[i];if ((child.mViewFlags & VISIBILITY_MASK) == VISIBLE || child.getAnimation() != null) {more |= drawChild(canvas, child, drawingTime);}}} else {for (int i = 0; i < count; i++) {final View child = children[getChildDrawingOrder(count, i)];if ((child.mViewFlags & VISIBILITY_MASK) == VISIBLE || child.getAnimation() != null) {more |= drawChild(canvas, child, drawingTime);}}}......}
代码一眼看出,就是遍历子View然后drawChild(),drawChild()方法实际调用的是子View.draw()方法,ViewGroup类已经为我们实现绘制子View的默认过程,这个实现基本能满足大部分需求,所以ViewGroup类的子类(LinearLayout,FrameLayout)也基本没有去重写dispatchDraw方法,我们在实现自定义控件,除非比较特别,不然一般也不需要去重写它, drawChild()的核心过程就是为子视图分配合适的cavas剪切区,剪切区的大小正是由layout过程决定的,而剪切区的位置取决于滚动值以及子视图当前的动画。设置完剪切区后就会调用子视图的draw()函数进行具体的绘制了。
第六步 对View的滚动条进行绘制
不是重点,知道有这东西就行,onDrawScrollBars 的一句注释 :Request the drawing of the horizontal and the vertical scrollbar. The scrollbars are painted only if they have been awakened first.
一张图看下整个draw的递归流程
到此整个绘制过程基本讲述完毕了。
参考资料:http://www.cnblogs.com/jycboy/p/6066654.html
版权声明:本站所有资料均为网友推荐收集整理而来,仅供学习和研究交流使用。

工作时间:8:00-18:00
客服电话
电子邮件
admin@qq.com
扫码二维码
获取最新动态