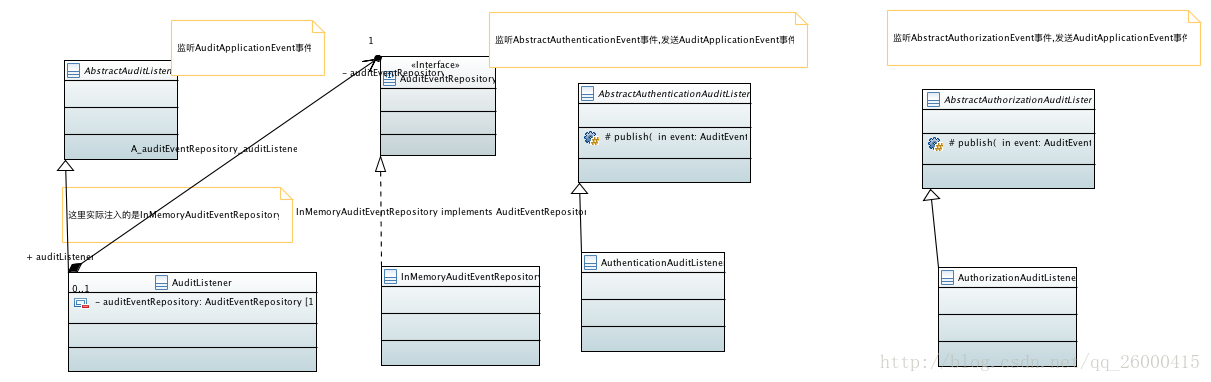
這篇文章我們來分析一下org.springframework.boot.actuate.security,org.springframework.boot.actuate.audit中的代碼,這2個包的類是對spring security 的事件進行處理的.類圖如下:
AuditEvent–> 1個值對象–>代表了1個audit event: 在特定的時間,1個特定的用戶或者代理,實施了1個特定類型的動作.AuditEvent記錄了有關AuditEvent的細節.
其類上有如下注解:
@JsonInclude(Include.NON_EMPTY)代表該類中為空(“”)或者為null的屬性不會被序列化
springboot項目源碼。該類的字段如下:
private final Date timestamp;// 資源
private final String principal;private final String type;private final Map<String, Object> data;AuditApplicationEvent–> 封裝AuditEvent.代碼如下:
public class AuditApplicationEvent extends ApplicationEvent {private final AuditEvent auditEvent;public AuditApplicationEvent(String principal, String type,Map<String, Object> data) {this(new AuditEvent(principal, type, data));}AuditApplicationEvent(String principal, String type, String... data) {this(new AuditEvent(principal, type, data));}public AuditApplicationEvent(Date timestamp, String principal, String type,Map<String, Object> data) {this(new AuditEvent(timestamp, principal, type, data));}public AuditApplicationEvent(AuditEvent auditEvent) {super(auditEvent);Assert.notNull(auditEvent, "AuditEvent must not be null");this.auditEvent = auditEvent;}public AuditEvent getAuditEvent() {return this.auditEvent;}}
AbstractAuditListener –>處理AuditApplicationEvent事件的抽象類.代碼如下:
public abstract class AbstractAuditListenerimplements ApplicationListener<AuditApplicationEvent> {@Overridepublic void onApplicationEvent(AuditApplicationEvent event) {onAuditEvent(event.getAuditEvent());}protected abstract void onAuditEvent(AuditEvent event);}
AuditEventRepository–> 關于AuditEvent的dao實現.聲明了如下4個方法:
// 添加日志
void add(AuditEvent event);// 查詢指定日期之后的AuditEvent
List<AuditEvent> find(Date after);// 根據給定的Date和principal(資源)獲得對應的AuditEvent
List<AuditEvent> find(String principal, Date after);// 根據給的date,principal,type 類獲取給定的AuditEvent
List<AuditEvent> find(String principal, Date after, String type);
InMemoryAuditEventRepository –> AuditEventRepository接口的唯一實現.
該類的字段如下:
// AuditEvent數組默認的默認大小
private static final int DEFAULT_CAPACITY = 4000;// 用于對events進行操作時 加的鎖
private final Object monitor = new Object();/*** Circular buffer of the event with tail pointing to the last element.* 循環數組*/
private AuditEvent[] events;// 最后1個元素的下標
private volatile int tail = -1;
Spring Boot?構造器如下:
public InMemoryAuditEventRepository() {this(DEFAULT_CAPACITY);
}public InMemoryAuditEventRepository(int capacity) {this.events = new AuditEvent[capacity];
}
AuditEventRepository中的方法實現如下:
add,代碼如下:
public void add(AuditEvent event) {Assert.notNull(event, "AuditEvent must not be null");synchronized (this.monitor) {this.tail = (this.tail + 1) % this.events.length;this.events[this.tail] = event;}
}
find(java.util.Date) 實現如下:
public List<AuditEvent> find(Date after) {return find(null, after, null);
}
find(String, Date) 實現如下:
public List<AuditEvent> find(String principal, Date after) {return find(principal, after, null);
}
find(java.util.Date)和find(String, Date) 最終都調用find(String, Date, String)來實現.
Spring源碼深度解析。find(String, Date, String),代碼如下:
public List<AuditEvent> find(String principal, Date after, String type) {LinkedList<AuditEvent> events = new LinkedList<AuditEvent>();synchronized (this.monitor) {// 1. 遍歷eventsfor (int i = 0; i < this.events.length; i++) {// 1.1 獲得最新的AuditEventAuditEvent event = resolveTailEvent(i);// 1.2 如果AuditEvent 不等于null并且符合查詢要求的話,就加入到events中if (event != null && isMatch(principal, after, type, event)) {events.addFirst(event);}}}// 2. 返回結果集return events;
}
遍歷events
獲得最新的AuditEvent,代碼如下:
private AuditEvent resolveTailEvent(int offset) {int index = ((this.tail + this.events.length - offset) % this.events.length);return this.events[index];
}
如果AuditEvent 不等于null并且符合查詢要求的話,就加入到events中.符合查詢要求的代碼如下:
private boolean isMatch(String principal, Date after, String type, AuditEvent event) {boolean match = true;match = match && (principal == null || event.getPrincipal().equals(principal));match = match && (after == null || event.getTimestamp().compareTo(after) >= 0);match = match && (type == null || event.getType().equals(type));return match;
}
返回結果集
這里有2個問題:
spring boot vue、前面說過訪問events的時候都需要進行加鎖,為什么resolveTailEvent方法沒有加鎖?
原因如下: resolveTailEvent的調用點只有1個,就是在find(String Date , String)中,而在該方法中已經加鎖了,因此該方法不需要加鎖.
resolveTailEvent方法加鎖可以嗎
答: 可以,原因是synchronized 是可重入的.但是不推薦,如果加上,會產生性能損耗.
關于這個方法的實現原理我們還是舉個例子比較好.假設我們的數組長度為3個,此時已經放滿數組了,如下:
[0,1,2]
spring源碼分析、此時tail = 2, 然后我們繼續放入3,則數組如下:
[3,1,2],此時tail = 0. 然后我們調用find.在該方法中會調用resolveTailEvent.
因此說find(String, Date, String)獲得的結果時按照添加的順序倒序返回的.
自動裝配:
聲明在AuditEventRepositoryConfiguration中,代碼如下:
@ConditionalOnMissingBean(AuditEventRepository.class)
protected static class AuditEventRepositoryConfiguration {@Beanpublic InMemoryAuditEventRepository auditEventRepository() throws Exception {return new InMemoryAuditEventRepository();}}
當beanFactory中不存在 AuditEventRepository類型的bean時生效.注冊1個id為auditEventRepository,類型為InMemoryAuditEventRepository的bean.
mybatis源碼深度解析?AuditListener–> AbstractAuditListener的默認實現.監聽AuditApplicationEvent事件然后存儲到AuditEventRepository中. 代碼如下:
public class AuditListener extends AbstractAuditListener {private static final Log logger = LogFactory.getLog(AuditListener.class);private final AuditEventRepository auditEventRepository;public AuditListener(AuditEventRepository auditEventRepository) {this.auditEventRepository = auditEventRepository;}@Overrideprotected void onAuditEvent(AuditEvent event) {if (logger.isDebugEnabled()) {logger.debug(event);}this.auditEventRepository.add(event);}}監聽到AuditApplicationEvent時,直接將其封裝的AuditEvent加入到AuditEventRepository中.還是比較簡單的.
自動裝配如下:
在AuditAutoConfiguration中進行了聲明,代碼如下:
@Bean
@ConditionalOnMissingBean(AbstractAuditListener.class)
public AuditListener auditListener() throws Exception {return new AuditListener(this.auditEventRepository);
}注意,在AuditListener中注入的是InMemoryAuditEventRepository
AbstractAuthenticationAuditListener–> 暴露 Spring Security AbstractAuthenticationEvent(認證事件) 將其轉換為AuditEvent 的抽象ApplicationListener基類.
springboot進銷存源碼?代碼如下:
public abstract class AbstractAuthenticationAuditListener implementsApplicationListener<AbstractAuthenticationEvent>, ApplicationEventPublisherAware {private ApplicationEventPublisher publisher;@Overridepublic void setApplicationEventPublisher(ApplicationEventPublisher publisher) {this.publisher = publisher;}protected ApplicationEventPublisher getPublisher() {return this.publisher;}protected void publish(AuditEvent event) {if (getPublisher() != null) {getPublisher().publishEvent(new AuditApplicationEvent(event));}}
}字段如下:
// 當發生AuthenticationSuccessEvent事件時添加到AuditEvent中的type
public static final String AUTHENTICATION_SUCCESS = "AUTHENTICATION_SUCCESS";// 當發生AbstractAuthenticationFailureEvent事件時添加到AuditEvent中的type
public static final String AUTHENTICATION_FAILURE = "AUTHENTICATION_FAILURE";// 當發生AuthenticationSwitchUserEvent事件時添加到AuditEvent中的type
public static final String AUTHENTICATION_SWITCH = "AUTHENTICATION_SWITCH";private static final String WEB_LISTENER_CHECK_CLASS = "org.springframework.security.web.authentication.switchuser.AuthenticationSwitchUserEvent";private WebAuditListener webListener = maybeCreateWebListener();// 只要加入spring-boot-starter-security的依賴,就會在當前類路徑下存在org.springframework.security.web.authentication.switchuser.AuthenticationSwitchUserEvent
// 因此會返回WebAuditListener
private static WebAuditListener maybeCreateWebListener() {if (ClassUtils.isPresent(WEB_LISTENER_CHECK_CLASS, null)) {return new WebAuditListener();}return null;
}
onApplicationEvent 方法實現如下:
public void onApplicationEvent(AbstractAuthenticationEvent event) {// 1. 如果驗證失敗,if (event instanceof AbstractAuthenticationFailureEvent) {onAuthenticationFailureEvent((AbstractAuthenticationFailureEvent) event);}// 2.如果webListener不等于null.并且該事件為AuthenticationSwitchUserEventelse if (this.webListener != null && this.webListener.accepts(event)) {this.webListener.process(this, event);}// 3. 如果是AuthenticationSuccessEventelse if (event instanceof AuthenticationSuccessEvent) {onAuthenticationSuccessEvent((AuthenticationSuccessEvent) event);}
}
如果驗證失敗(AbstractAuthenticationFailureEvent),則發送AuditEvent事件,其type為AUTHENTICATION_FAILURE.代碼如下:
private void onAuthenticationFailureEvent(AbstractAuthenticationFailureEvent event) {Map<String, Object> data = new HashMap<String, Object>();data.put("type", event.getException().getClass().getName());data.put("message", event.getException().getMessage());if (event.getAuthentication().getDetails() != null) {data.put("details", event.getAuthentication().getDetails());}publish(new AuditEvent(event.getAuthentication().getName(),AUTHENTICATION_FAILURE, data));
}
如果webListener不等于null.并且該事件為AuthenticationSwitchUserEvent,則發送AuditEvent事件,其type為AUTHENTICATION_SWITCH.代碼如下:
public void process(AuthenticationAuditListener listener,AbstractAuthenticationEvent input) {if (listener != null) {AuthenticationSwitchUserEvent event = (AuthenticationSwitchUserEvent) input;Map<String, Object> data = new HashMap<String, Object>();if (event.getAuthentication().getDetails() != null) {data.put("details", event.getAuthentication().getDetails());}data.put("target", event.getTargetUser().getUsername());listener.publish(new AuditEvent(event.getAuthentication().getName(),AUTHENTICATION_SWITCH, data));}}如果是AuthenticationSuccessEvent,則發送AuditEvent事件,其type為AUTHENTICATION_SUCCESS.代碼如下:
private void onAuthenticationSuccessEvent(AuthenticationSuccessEvent event) {Map<String, Object> data = new HashMap<String, Object>();if (event.getAuthentication().getDetails() != null) {data.put("details", event.getAuthentication().getDetails());}publish(new AuditEvent(event.getAuthentication().getName(),AUTHENTICATION_SUCCESS, data));
}
springmvc源碼深度解析?自動裝配:
在AuditAutoConfiguration中進行了聲明,代碼如下:
@Bean
@ConditionalOnClass(name = "org.springframework.security.authentication.event.AbstractAuthenticationEvent")
@ConditionalOnMissingBean(AbstractAuthenticationAuditListener.class)
public AuthenticationAuditListener authenticationAuditListener() throws Exception {return new AuthenticationAuditListener();
}AbstractAuthorizationAuditListener –>1個暴露AbstractAuthorizationEvent(授權事件)作為AuditEvent的抽象ApplicationListener基類.代碼如下:
public abstract class AbstractAuthorizationAuditListener implementsApplicationListener<AbstractAuthorizationEvent>, ApplicationEventPublisherAware {private ApplicationEventPublisher publisher;@Overridepublic void setApplicationEventPublisher(ApplicationEventPublisher publisher) {this.publisher = publisher;}protected ApplicationEventPublisher getPublisher() {return this.publisher;}protected void publish(AuditEvent event) {if (getPublisher() != null) {getPublisher().publishEvent(new AuditApplicationEvent(event));}}}
字段如下:
// 發生AuthorizationFailureEvent事件時對應的AuditEvent的類型
public static final String AUTHORIZATION_FAILURE = "AUTHORIZATION_FAILURE";
onApplicationEvent代碼如下:
public void onApplicationEvent(AbstractAuthorizationEvent event) {// 1. 如果是AuthenticationCredentialsNotFoundEvent事件,則發送AuditEvent事件,type為AUTHENTICATION_FAILUREif (event instanceof AuthenticationCredentialsNotFoundEvent) {onAuthenticationCredentialsNotFoundEvent((AuthenticationCredentialsNotFoundEvent) event);}// 2. 如果是AuthorizationFailureEvent事件,則發送AuditEvent事件,type為AUTHORIZATION_FAILUREelse if (event instanceof AuthorizationFailureEvent) {onAuthorizationFailureEvent((AuthorizationFailureEvent) event);}
}
如果是AuthenticationCredentialsNotFoundEvent事件,則發送AuditEvent事件,type為AUTHENTICATION_FAILURE.代碼如下:
private void onAuthenticationCredentialsNotFoundEvent(AuthenticationCredentialsNotFoundEvent event) {Map<String, Object> data = new HashMap<String, Object>();data.put("type", event.getCredentialsNotFoundException().getClass().getName());data.put("message", event.getCredentialsNotFoundException().getMessage());publish(new AuditEvent("<unknown>",AuthenticationAuditListener.AUTHENTICATION_FAILURE, data));
}
java.lang.illegalaccesserror,如果是AuthorizationFailureEvent事件,則發送AuditEvent事件,type為AUTHORIZATION_FAILURE.代碼如下:
private void onAuthorizationFailureEvent(AuthorizationFailureEvent event) {Map<String, Object> data = new HashMap<String, Object>();data.put("type", event.getAccessDeniedException().getClass().getName());data.put("message", event.getAccessDeniedException().getMessage());if (event.getAuthentication().getDetails() != null) {data.put("details", event.getAuthentication().getDetails());}publish(new AuditEvent(event.getAuthentication().getName(), AUTHORIZATION_FAILURE,data));
}
自動裝配:
在AuditAutoConfiguration中進行了裝配,代碼如下:
@Bean
@ConditionalOnClass(name = "org.springframework.security.access.event.AbstractAuthorizationEvent")
@ConditionalOnMissingBean(AbstractAuthorizationAuditListener.class)
public AuthorizationAuditListener authorizationAuditListener() throws Exception {return new AuthorizationAuditListener();
}如果想讓 spring boot 應用激活AuditEvent的事件的處理,需要加入spring-boot-starter-security依賴,代碼如下:
<dependency><groupId>org.springframework.boot</groupId><artifactId>spring-boot-starter-security</artifactId>
</dependency>
光加入依賴還不夠,我們需要加入security的配置,不然AuthorizationAuditListener,AuthenticationAuditListener 監聽什么事件呢? 因此,我們加入如下代碼:
@Configuration
@EnableWebSecurity
public class WebSecurityConfig extends WebSecurityConfigurerAdapter {@Overrideprotected void configure(HttpSecurity http) throws Exception {http.authorizeRequests().antMatchers("/error-log").hasAuthority("ROLE_TEST").antMatchers("/", "/home").permitAll().anyRequest().authenticated().and().formLogin().loginPage("/login").permitAll().and().logout().logoutUrl("/logout").permitAll().and().authorizeRequests();}@Autowiredpublic void configureGlobal(AuthenticationManagerBuilder auth) throws Exception {auth.inMemoryAuthentication().withUser("user").password("password").roles("USER");}
}在configure中我們配置了如下內容:
springbootpdf下載。聲明1個UserController,代碼如下:
@Controller
public class UserController {@RequestMapping("/")public String index() {return "index";}@RequestMapping("/hello")public String hello() {return "hello";}@RequestMapping(value = "/login", method = RequestMethod.GET)public String login() {return "login";}@RequestMapping("/error-test")public String error() {return "1";}
}
在src/main/resources/templates目錄下創建如下幾個頁面:
hello.html,代碼如下:
<!DOCTYPE html>
<html xmlns="http://www.w3.org/1999/xhtml" xmlns:th="http://www.thymeleaf.org"xmlns:sec="http://www.thymeleaf.org/thymeleaf-extras-springsecurity3">
<head><title>Hello World!</title>
</head>
<body>
<h1 th:inline="text">Hello [[${#httpServletRequest.remoteUser}]]!</h1>
<form th:action="@{/logout}" method="post"><input type="submit" value="注銷"/>
</form>
</body>
</html>
index.html,代碼如下:
<!DOCTYPE html>
<html xmlns="http://www.w3.org/1999/xhtml" xmlns:th="http://www.thymeleaf.org"xmlns:sec="http://www.thymeleaf.org/thymeleaf-extras-springsecurity3">
<head><title>Spring Security入門</title>
</head>
<body>
<h1>歡迎使用Spring Security!</h1>
<p>點擊 <a th:href="@{/hello}">這里</a> 打個招呼吧</p>
</body>
</html>
login.html,代碼如下:
<!DOCTYPE html>
<html xmlns="http://www.w3.org/1999/xhtml"xmlns:th="http://www.thymeleaf.org"xmlns:sec="http://www.thymeleaf.org/thymeleaf-extras-springsecurity3"><head><title>Spring Security Example </title></head><body><div th:if="${param.error}">用戶名或密碼錯</div><div th:if="${param.logout}">您已注銷成功</div><form th:action="@{/login}" method="post"><div><label> 用戶名 : <input type="text" name="username"/> </label></div><div><label> 密  碼 : <input type="password" name="password"/> </label></div><div><input type="submit" value="登錄"/></div></form></body>
</html>
測試
spring注解源碼解析、啟動應用后我們訪問如下鏈接: http://127.0.0.1:8080/,返回的是如下頁面:
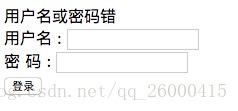
點擊index.html 中的超鏈接后,由于需要進行驗證,返回到login頁面,如圖:
此時我們輸入錯誤的用戶名,密碼,返回的頁面如下:
springboot啟動流程詳解,此時我們輸入user,password 后,返回的頁面如下:
點擊注銷后,頁面如下:

此時我們訪問 http://127.0.0.1:8080/error-test,由于沒有登錄,還是調回到登錄頁面.
訪問 http://127.0.0.1:8080/auditevents,返回的結果如下:
{
events: [{timestamp: "2018-01-23T03:52:13+0000",principal: "anonymousUser",type: "AUTHORIZATION_FAILURE",data: {details: {remoteAddress: "127.0.0.1",sessionId: null},type: "org.springframework.security.access.AccessDeniedException",message: "Access is denied"}
},{timestamp: "2018-01-23T03:54:21+0000",principal: "aaa",type: "AUTHENTICATION_FAILURE",data: {details: {remoteAddress: "127.0.0.1",sessionId: "DFDB023AEEF41BBD8079EC32402CBFD8"},type: "org.springframework.security.authentication.BadCredentialsException",message: "Bad credentials"}},{timestamp: "2018-01-23T03:55:50+0000",principal: "user",type: "AUTHENTICATION_SUCCESS",data: {details: {remoteAddress: "127.0.0.1",sessionId: "DFDB023AEEF41BBD8079EC32402CBFD8"}}},{timestamp: "2018-01-23T03:58:38+0000",principal: "anonymousUser",type: "AUTHORIZATION_FAILURE",data: {details: {remoteAddress: "127.0.0.1",sessionId: "6E6E614D638B6F5EE5B7E8CF516E2534"},type: "org.springframework.security.access.AccessDeniedException",message: "Access is denied"}},{timestamp: "2018-01-23T04:00:01+0000",principal: "anonymousUser",type: "AUTHORIZATION_FAILURE",data: {details: {remoteAddress: "127.0.0.1",sessionId: "6E6E614D638B6F5EE5B7E8CF516E2534"},type: "org.springframework.security.access.AccessDeniedException",message: "Access is denied"}},{timestamp: "2018-01-23T04:00:12+0000",principal: "user",type: "AUTHENTICATION_SUCCESS",data: {details: {remoteAddress: "127.0.0.1",sessionId: "6E6E614D638B6F5EE5B7E8CF516E2534"}}}
]
}mybatis3源碼深度解析、當我們訪問 http://127.0.0.1:8080/hello.html 時,由于需要驗證,因此會發送AuthorizationFailureEvent事件,此時會交由AuthorizationAuditListener處理,調用onAuthorizationFailureEvent方法.發送AuditEvent事件
AuditListener 監聽該事件,最終執行onAuditEvent方法,將AuditEvent存入到InMemoryAuditEventRepository中.
此時在login.html中,我們輸入錯誤的用戶名,密碼,此時會發送AuthenticationFailureBadCredentialsEvent事件,交由AuthenticationAuditListener處理,最終執行onAuthenticationFailureEvent方法,發送AuditEvent事件, 最終還是在AuditListener中將事件存到 InMemoryAuditEventRepository中
此時我們輸入正確的用戶名密碼后,會發送AuthenticationSuccessEvent事件,交由AuthenticationAuditListener事件處理,最終執行onAuthenticationSuccessEvent方法,發送AuditEvent事件,最終還是在AuditListener中將事件存到InMemoryAuditEventRepository中
之后產生了SessionFixationProtectionEvent事件,AuthenticationAuditListener不進行處理
產生InteractiveAuthenticationSuccessEvent,AuthenticationAuditListener不進行處理.
@SpringBootApplication、此時跳轉到hello.html ,我們點擊注銷后,沒有產生任何的事件.
登錄成功后,我們訪問/error-log,由于需要ROLE_TEST權限,而user 只有ROLE_USER 權限,因此會產生AuthorizationFailureEvent事件,因此會交由AuthorizationAuditListener處理,發送AuditEvent事件,最終還是在AuditListener中將事件存到InMemoryAuditEventRepository中
版权声明:本站所有资料均为网友推荐收集整理而来,仅供学习和研究交流使用。

工作时间:8:00-18:00
客服电话
电子邮件
admin@qq.com
扫码二维码
获取最新动态