adobe air 工程师
So, I’ve been issued a challenge at SitePoint to develop a piece of software in order to write an article about the experience. I can honestly say it’s so far been a real revalation – an experience that has made me betray all my deeply held web standards principles. Did I forget all about semantic markup? Yes. Did I completely ignore cross-browser compatibility? Yes. Did I even consider using HTML tables for layout? Yes. Did I feel unclean but excited all at the same time? YES!
因此,在SitePoint上我面临开发一个软件的挑战,以便撰写有关该体验的文章。 可以说,到目前为止,这是一次真正的复兴-一次经历使我背叛了我所有根深蒂固的Web标准原则。 我是否忘记了语义标记? 是。 我是否完全忽略了跨浏览器的兼容性? 是。 我什至考虑过使用HTML表格进行布局吗? 是。 我是否同时感到不洁但很兴奋? 是!
I built a desktop application with Adobe AIR … and I liked it!
我使用Adobe AIR构建了一个桌面应用程序……我喜欢它!
Yep, using free software and HTML, CSS, and jQuery, I made my own cross-platform desktop application using Adobe AIR. Well, the beginnings of one at least. Pay attention when you read this article because there’ll be a test afterwards. Answer the quiz, and you could win one of 100 free copies of Getting Started With Adobe Flex 3.
是的,使用免费软件和HTML,CSS和jQuery ,我使用Adobe AIR制作了自己的跨平台桌面应用程序。 好吧,至少是一个开始。 阅读本文时请注意,因为稍后将进行测试。 回答测验 ,您将赢得100份免费的Adobe Flex 3入门之一 。
The challenge was to build a useful application (rather than another to-do list, thankfully) to make use of the new flippa.com web site – it’s a marketplace for buying and selling web sites. So here’s the idea. Imagine you’re interested in buying a web site about photography with a forum attached. You open this application, fill in the custom search form, and see a list of matching auctions. The app will let you pick the auctions you want to watch and it’ll notify you every time there’s a new bid. Also, it will keep polling the site to see if there are any new auctions that match your search query, using nothing but HTML, CSS, jQuery, and the publicly available Atom feeds from flippa.com.
面临的挑战是要构建一个有用的应用程序(而不是另一个待办事项列表)来利用新的flippa.com网站-这是买卖网站的市场。 所以这就是想法。 想象一下,您有兴趣购买带有摄影论坛的网站。 您打开此应用程序,填写自定义搜索表单,然后查看匹配拍卖的列表。 该应用程序可让您选择要观看的拍卖,并在每次有新出价时通知您。 此外,它将继续轮询网站,以查看是否有任何与您的搜索查询匹配的新拍卖,仅使用HTML,CSS,jQuery和flippa.com上公开可用的Atom提要。
And, I want to call it Harpoon.
而且,我想称它为鱼叉 。
AIR uses the WebKit rendering engine also used in Safari and Chrome, so even though you’re using standard web development technology you’re only developing for one rendering engine. All it took to make the application up to this point was a single HTML (ui.html) and CSS file (styles.css), and some supporting JavaScript files.
AIR使用的Safari和Chrome也使用了WebKit渲染引擎,因此,即使您使用标准的Web开发技术,也只能为一个渲染引擎进行开发。 到目前为止,使应用程序所需要做的只是一个HTML(ui.html)和CSS文件(styles.css),以及一些支持JavaScript的文件。
There is an application.xml configuration file but you can rely on Aptana to do that for you. Aptana has an AIR plugin that makes development push-button simple. You can read about how to set it up in the article Learn Adobe AIR, Part I: Build A Note Storage App by Akash Mehta. Other than having a handy run button that lets you test-run your AIR app and debug, it presents the application.xml file in a tabbed form for easy editing.
有一个application.xml配置文件,但是您可以依靠Aptana来完成。 Aptana有一个AIR插件 ,可简化开发按钮。 您可以在Akash Mehta的“ 学习Adobe AIR,第一部分:构建Note存储应用程序 ”一文中了解有关如何进行设置的信息 。 除了具有方便的运行按钮(使您可以测试AIR应用程序并进行调试)之外,它还以选项卡式形式显示application.xml文件,以便于编辑。
Other than using Aptana, you can edit the files in whichever editor you like. Akash has also written an article that describes this process called Walk on AIR: Create a To-do List in Five Minutes.
除了使用Aptana之外,您可以使用任何喜欢的编辑器来编辑文件。 Akash还写了一篇文章描述此过程,称为“ 在AIR上行走:五分钟内创建待办事项清单” 。
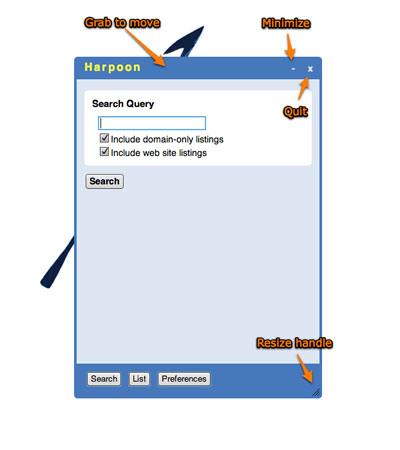
One of the cool tricks you can do with AIR is make an app without window chrome and a transparent body. This enables you to style your app any way you like. My demo is fairly conservative but I imagine that designers with a greater talent for graphics will be able to go crazy and create all sorts of imaginative application layouts.
您可以使用AIR的一些很酷的技巧来制作一个没有窗口镶边和透明主体的应用程序。 这使您可以根据自己的喜好来设置应用样式。 我的演示相当保守,但我认为具有较强图形处理能力的设计师将能够发疯,并创建各种富有想象力的应用程序布局。
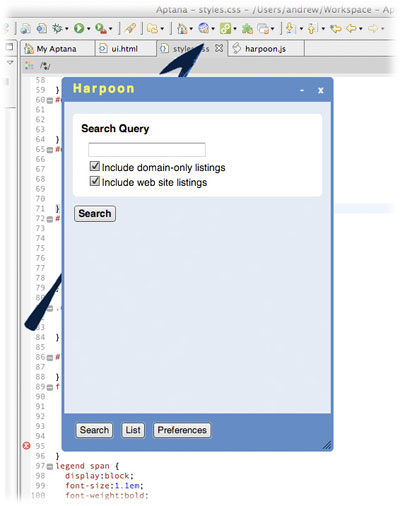
Here’s my amateur effort:
这是我业余的努力:
The plan was to create the following: a title bar for the app title, minimize controls, quit controls, a footer that will house the controls to switch application modes, and the bottom-corner window-resize handle. In between the title bar and the footer is the main application area.
计划创建以下内容:应用程序标题的标题栏,最小化控件,退出控件,用于容纳控件以切换应用程序模式的页脚以及底部角落的窗口大小调整手柄。 标题栏和页脚之间是主要应用区域。
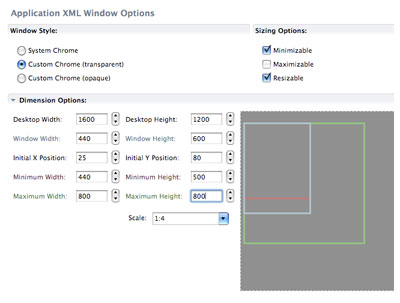
In the Application XML Window Settings you need to set Window Style to Custom Chrome (transparent) as pictured previously. I’ll also enable Minimizable and Resizable in Sizing Options.
在Application XML Window Settings中,您需要将Window Style设置为Custom Chrome(透明),如上图所示。 我还将在“大小调整选项”中启用“最小化”和“可调整大小”。
After messing around for a while with positioning and trying to make the element heights right – it’s actually quite tricky using CSS to make a fixed header and footer with a scrollable content area and still allow for window resizing – here’s the HTML I came up with:
经过一段时间的定位并尝试使元素的高度正确-在使用CSS制作具有可滚动内容区域的固定页眉和页脚并仍然允许调整窗口大小的同时,这实际上是非常棘手的-这是我想出HTML:
<body>
<div id="wrapper">
<div id="app">
...
</div> <!-- app -->
<div id="head">
...
</div>
<div id="foot">
...
</div>
</div> <!-- wrapper -->

</body>
The body element is transparent and has some padding applied in order for the background image to be seen outside of our custom window chrome.
body元素是透明的,并应用了一些填充,以便可以在自定义窗口镶边之外看到背景图像。
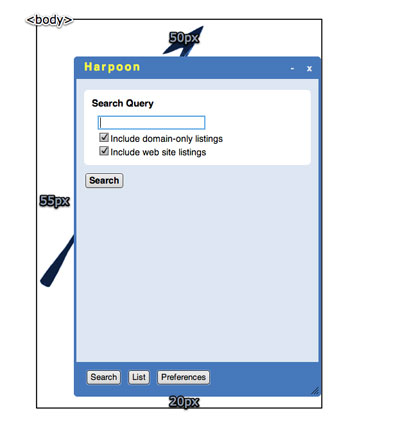
Here’s the CSS for our body element: body { font-family: Helvetica, Tahoma, Arial, sans-serif; font-size:14px; padding: 50px 0 20px 55px; margin: 0; background: transparent url(icons/harpoon.png) no-repeat fixed; }
这是我们body元素CSS: body { font-family: Helvetica, Tahoma, Arial, sans-serif; font-size:14px; padding: 50px 0 20px 55px; margin: 0; background: transparent url(icons/harpoon.png) no-repeat fixed; } body { font-family: Helvetica, Tahoma, Arial, sans-serif; font-size:14px; padding: 50px 0 20px 55px; margin: 0; background: transparent url(icons/harpoon.png) no-repeat fixed; }
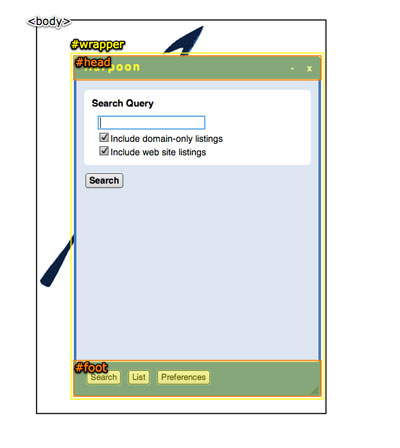
The application interface is wrapped inside the (imaginatively named) wrapper element. This element has a height and max-height set to 100%. We do this so that the wrapper element always fills the viewport but never expands to a size greater than the viewport, which would cause ugly scrollbars to appear and ruin the layout. The wrapper element also needs to be relatively positioned to provide a positioning context for the head and foot elements.
应用程序接口被包装在(富有想象力的) wrapper元素内。 此元素的height和max-height设置为100%。 我们这样做是为了使wrapper元素始终填充视口,但永远不会扩展到大于视口的大小,这将导致难看的滚动条出现并破坏布局。 wrapper元件还需要相对定位以为head和foot元件提供定位环境。
Here’s the CSS:
这是CSS:
#wrapper {
position: relative;
padding: 0;
margin: 0;
height: 100%;
max-height: 100%;

}
The head and foot elements are both absolutely positioned (relative to the wrapper element): the head element with top: 0; and bottom: 0; for the foot element. There’s more to consider though, because while I want these elements to be 100% wide, I also want them to have a rounded border. So, what’s the problem? Well, if you specify a width of 100% and add borders, according to the rules of the box model the border increases the width of the box, making them wider than 100%. This will cause all sorts of ugly problems.
head和foot元素都绝对定位(相对于wrapper元素): top: 0;的head元素top: 0; bottom: 0; foot元素。 不过,还有更多需要考虑的问题,因为尽管我希望这些元素的宽度为100%,但我也希望它们具有圆角的边框。 所以有什么问题? 好吧,如果您指定100%的宽度并添加边框,则根据盒子模型的规则,边框会增加盒子的宽度,使它们的宽度大于100%。 这将导致各种丑陋的问题。
The answer is the -webkit-box-sizing property. The box-sizing property is a CSS3 property that switches the box model used for that element. WebKit supports it in a custom vendor-extension. If we set it to border-box, the borders (and padding) will be included in the specified width (just like the old IE5.x box model!). You know, I honestly thought I’d never find a need to use that property. Here it lets me specify a width of 100% and then apply padding and borders without worrying that it’ll break the layout.
答案是-webkit-box-sizing属性。 box-sizing属性是一个CSS3属性,用于切换用于该元素的box模型。 WebKit在自定义的供应商扩展中支持它。 如果将其设置为border-box ,则边框(和填充)将包含在指定的宽度中(就像旧的IE5.x盒子模型一样!)。 您知道,老实说,我永远也不需要使用该属性。 在这里,我可以指定100%的宽度,然后应用填充和边框,而不必担心会破坏布局。
It’s also worth noting I’ve used the WebKit custom border-radius extension to make nice rounded borders. Much has been written about this property so I’ll leave out my two cents worth here. You’ll also notice I specify the move cursor for the head element. That’s because it’ll eventually become the grab handle for moving our window around.
还值得注意的是,我使用了WebKit自定义的border-radius扩展来制作漂亮的圆形边界。 关于这个财产的文章很多,所以我在这里遗漏了我的两分钱。 您还会注意到,我为head元素指定了move光标。 那是因为它最终将成为移动窗口的抓手。
Here’s the CSS:
这是CSS:
#head, #foot {
position: absolute;
-webkit-box-sizing: border-box;
border: 6px solid #3378be;
width: 100%;
padding: 0 10px;
background-color: #3378be;

}

#head {
top: 0;
height: 35px;
-webkit-border-top-left-radius: 6px;
-webkit-border-top-right-radius: 6px;
cursor: move;

}

#foot {
bottom: 0;
height: 50px;
-webkit-border-bottom-left-radius: 6px;
-webkit-border-bottom-right-radius: 6px;

}
Now we come to the fun part. The app element needs to grow and shrink according to window size but also be scrollable. To make the head and foot elements fixed while allowing the app element to scroll requires the use of the position: fixed; CSS property value. A fixed positioning means the element is positioned in relation to the viewport. You probably forgot that fixed was even valid for the position property. Lack of IE6 support has historically kept it in the dark. But there’s no need to worry about that here; WebKit supports it fine. Actually, IE7 and above supports it now too, so you can probably start considering it when designing web layouts.
现在我们来谈谈有趣的部分。 app元素需要根据窗口大小进行增大和缩小,但也可以滚动。 要在允许app元素滚动的同时使头和脚元素固定,需要使用position: fixed; CSS属性值。 固定定位意味着该元素相对于视口进行定位。 您可能忘记了fixed对于position属性甚至是有效的。 过去,缺乏IE6支持一直使它处于黑暗之中。 但是这里不必担心。 WebKit很好地支持它。 实际上,IE7及更高版本现在也支持它,因此您可以在设计Web布局时开始考虑它。
After applying position: fixed; to the app element we also specify the top, bottom, left, and right properties. By doing so there’s no need to specify height or width; the element will be automatically resized to suit. We’ve also added a min-height and overflow: auto; to cause the scrollbar to appear, if necessary. Here’s the CSS with the figure below displaying the result:
申请position: fixed; 对于app元素,我们还指定了top , bottom , left和right属性。 这样做无需指定height或width ; 元素将自动调整大小以适合。 我们还添加了min-height和overflow: auto; 必要时使滚动条出现。 这是CSS,下图显示了结果:
#app {
position: fixed;
top: 80px;
bottom: 70px;
left: 55px;
right: 0;
overflow: auto;
min-height: 300px;
...

}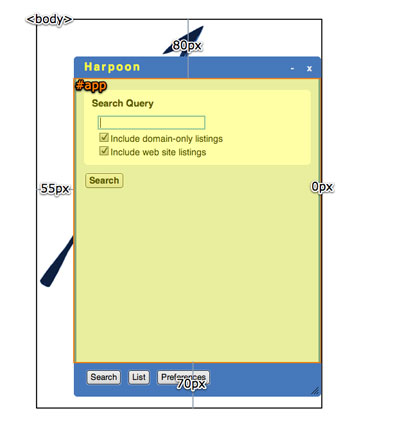
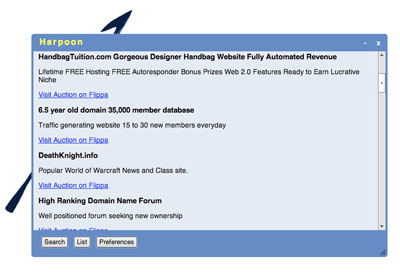
There you have it, our layout is complete. And just to show you how flexible it is, here’s the application displaying a list of search results while having been resized:
在那里,我们的布局已经完成。 只是为了向您展示它的灵活性,以下是在调整大小后显示搜索结果列表的应用程序:
Ignoring the application area in the middle for the moment, the next step will be to wire up all the window controls, like the minimize and quit buttons, window dragging, and the resizing handle. Here’s the plan:
现在暂时忽略中间的应用程序区域,下一步将是连接所有窗口控件,例如最小化和退出按钮,窗口拖动和调整大小手柄。 这是计划:
As it turns out adding custom window controls is very easy.
事实证明,添加自定义窗口控件非常容易。
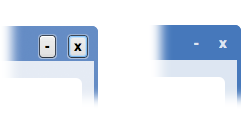
The minimize and quit buttons are simply a couple of HTML buttons with some CSS added. Here’s the markup:
最小化和退出按钮只是添加了一些CSS的几个HTML按钮。 这是标记:
<div id="window_control">
<button id="minimise_control">-</button>
<button id="quit_control">x</button>

</div>
The CSS removes the borders and applies a background-color, and a few other properties:
CSS删除了边框,并应用了background-color和其他一些属性:
#window_control button {
border: none;
background-color: #3378be;
color: #dae6f3;
font-weight: bold;
cursor: pointer;

}
The effect of the CSS can be seen in the figure below, with the finished button on the right:
下图显示了CSS的效果,右侧的完成按钮是:
While we can use jQuery to wire up the events that drive the button functions, we also need an AIR JavaScript file for the window API. AIR provides a file called AIRAliases.js that simply exposes a lot of AIR API functions. I’ve added the following to the HTML head of my ui.html file:
尽管我们可以使用jQuery连接驱动按钮功能的事件,但我们还需要一个AIR JavaScript文件作为窗口API。 AIR提供了一个名为AIRAliases.js的文件,该文件仅公开了许多AIR API函数。 我已将以下内容添加到ui.html文件HTML头中:
<script type="text/javascript" src="lib/air/AIRAliases.js"></script>

<script type="text/javascript" src="lib/jquery/jquery-1.3.2.min.js"></script>

<script type="text/javascript" src="scripts/harpoon.js"></script>
The harpoon.js file is where I keep all the custom JavaScript that drives the app.
我在harpoon.js文件中保留了驱动该应用程序的所有自定义JavaScript。
First we create a function that’s called when the application starts. Within this function we add event listeners to the window control buttons that will call the appropriate AIR functions. I like to keep all my custom JavaScript neatly namespaced so that I can see where the code calls a custom function instead of a jQuery or AIR function. Actually, I do it mostly out of habit, but it’s a good habit to have. So here’s the Harpoon object and a function called init that will be called when the application starts; the standard jQuery method works perfectly for this:
首先,我们创建一个在应用程序启动时调用的函数。 在此函数中,我们将事件侦听器添加到将调用适当的AIR函数的窗口控制按钮中。 我喜欢将所有自定义JavaScript的命名空间保持整洁,以便我可以看到代码在何处调用自定义函数而不是jQuery或AIR函数。 实际上,我这样做主要是出于习惯,但这是一个好习惯。 因此,这是Harpoon对象和一个名为init的函数,该函数在应用程序启动时将被调用; 标准jQuery方法非常适合此操作:
var Harpoon = {
init : function() {
// application setup happens here
}

}

$(document).ready(function() {
Harpoon.init();

});
We then create a function called setupWindow and call it from our init function:
然后,我们创建一个名为setupWindow的函数,并从我们的init函数中调用它:
var Harpoon = {
init : function() {
Harpoon.setupWindow();
},
setupWindow : function() {
}

}
Now we’re ready to add the event listeners. In our setupWindow function we bind event listeners for the click event to each button. These will in turn call our custom functions: Harpoon.minimize and Harpoon.quit:
现在我们准备添加事件侦听器。 在setupWindow函数中,将click事件的事件侦听器绑定到每个按钮。 这些将依次调用我们的自定义函数: Harpoon.minimize和Harpoon.quit :
setupWindow : function() {
$('#minimise_control').bind('click', function(event){
event.preventDefault();
Harpoon.minimize();
});
$('#quit_control').bind('click', function(event){
event.preventDefault();
Harpoon.quit();
});

}
The custom functions call the approriate AIR functions. We use the nativeWindow.minimize function for the minimize control :
自定义函数调用适当的AIR函数。 我们使用nativeWindow.minimize函数进行最小化控制:
minimize : function() {
nativeWindow.minimize();

}
That’s all we need to do for the minimize button (did you think this was going to be hard?). The function for the quit button is a little more complex, but only a little:
这就是我们要做的“最小化”按钮的全部操作(您认为这很难吗?)。 退出按钮的功能稍微复杂一点,但是只有一点点:
quit : function() {
var exitingEvent = new air.Event(air.Event.EXITING, false, true);
air.NativeApplication.nativeApplication.dispatchEvent(exitingEvent);
if (!exitingEvent.isDefaultPrevented()) {
air.NativeApplication.nativeApplication.exit();
}

}
This is the standard approach recommended by Adobe. The air.NativeApplication.nativeApplication.exit function is the one that actually closes the application, but the risk of calling this function is that you may have unsaved data you can lose. So instead Adobe recommend that you first create a new event called an exiting event:
这是Adobe建议的标准方法。 air.NativeApplication.nativeApplication.exit函数是实际上关闭应用程序的函数,但是调用此函数的风险是您可能会丢失未保存的数据。 因此,Adobe建议您首先创建一个称为退出事件的新事件:
var exitingEvent = new air.Event(air.Event.EXITING, false, true);Then you dispatch this event to your application:
然后,您将此事件调度到您的应用程序:
air.NativeApplication.nativeApplication.dispatchEvent(exitingEvent);In your application, if there’s any data you risk losing when the application quits, you create an event listener and listen for the exiting event. This event listener should cancel the exiting event and save any relevant data before the application exits. This is what our quit function is testing. If the exiting event is not cancelled then it’s okay to exit the application:
在您的应用程序中,如果在退出应用程序时可能会丢失任何数据,则可以创建一个事件侦听器并监听退出的事件。 此事件侦听器应取消退出事件,并在应用程序退出之前保存所有相关数据。 这就是我们的退出功能正在测试的内容。 如果退出事件未取消,则可以退出该应用程序:
if(!exitingEvent.isDefaultPrevented()) {
air.NativeApplication.nativeApplication.exit();

}
We’ll make use of this facility in our application later on.
稍后,我们将在我们的应用程序中使用此功能。
The window resize handle is a transparent PNG image placed in the bottom-right corner of the foot element:
窗口调整大小手柄是放置在foot元素右下角的透明PNG图像:
<img id="resize_control" src="icons/resize.png">

#resize_control {
position: absolute;
right: -3px;
bottom: -3px;
width: 20px;
height: 20px;

}
Here’s the transparent PNG image used and its final appearance in the application:
这是使用的透明PNG图像及其在应用程序中的最终外观:

It’s wired up in exactly the same way as the minimize and quit buttons. We add some code to our setupWindow function, this time listening for the mousedown event instead of the click event:
它的连接方式与“最小化”和“退出”按钮完全相同。 我们将一些代码添加到setupWindow函数中,这次是侦听mousedown事件而不是click事件:
$('#resize_control').bind('mousedown', function(event){
event.preventDefault();
Harpoon.resize();

});
Then we add the custom function to the Harpoon object:
然后,将自定义函数添加到Harpoon对象:
resize : function() {
nativeWindow.startResize(air.NativeWindowResize.BOTTOM_RIGHT);

}
You can add resize controls that resize the window from various directions. We’ve specified the bottom-right direction here.
您可以添加调整大小的控件,以从各个方向调整窗口的大小。 我们在此处指定了右下方向。
Making our window draggable is just as easy as creating the other window controls. We’ll use the head element as the handle, as that seems to be the most intuitive for users. Once again we add some code for our event listener (again the mousedown event):
使我们的窗口可拖动与创建其他窗口控件一样容易。 我们将使用head元素作为句柄,因为这对于用户而言似乎是最直观的。 再次为事件侦听器添加一些代码(同样是mousedown事件):
$('#head').bind('mousedown', function(event){
event.preventDefault();
Harpoon.move();

});
And the custom function:
和自定义功能:
move : function() {
nativeWindow.startMove();
}Our custom JavaScript file now looks like this:
For all our efforts, we now have custom-designed and completely functional window chrome for our application.
As far as Harpoon is concerned there's still a long way to go. The window design is unfinished and the application is functional but hardly complete. At the moment all you can do is perform a search and it'll use the custom search feeds from flippa.com for the results. Some of the challenges ahead include storing data in a database, making use of the auction bid feeds on flippa.com, refreshing the results automatically, and alerting the user. I'll keep you posted!
You can download all the Harpoon files and have a look yourself. Download Aptana and start your own AIR project; you can use the Harpoon window as a starting point if you like. It's a lot of fun, once you've started.
If you'd like to install Harpoon, first grab Adobe AIR, and then download Harpoon.
Remember to have a crack at the quiz and win a great prize!
move : function() {
nativeWindow.startMove();
}Our custom JavaScript file now looks like this:
For all our efforts, we now have custom-designed and completely functional window chrome for our application.
As far as Harpoon is concerned there's still a long way to go. The window design is unfinished and the application is functional but hardly complete. At the moment all you can do is perform a search and it'll use the custom search feeds from flippa.com for the results. Some of the challenges ahead include storing data in a database, making use of the auction bid feeds on flippa.com, refreshing the results automatically, and alerting the user. I'll keep you posted!
You can download all the Harpoon files and have a look yourself. Download Aptana and start your own AIR project; you can use the Harpoon window as a starting point if you like. It's a lot of fun, once you've started.
If you'd like to install Harpoon, first grab Adobe AIR , and then download Harpoon .
Remember to have a crack at the quiz and win a great prize!
翻译自: https://www.sitepoint.com/css-desktop-adobe-air/
adobe air 工程师
版权声明:本站所有资料均为网友推荐收集整理而来,仅供学习和研究交流使用。

工作时间:8:00-18:00
客服电话
电子邮件
admin@qq.com
扫码二维码
获取最新动态