歡迎關注原創視頻教程
https://edu.csdn.net/course/detail/36074
https://edu.csdn.net/course/detail/35475
今天QQ群里面有人問到誰有二維碼提取的工具,樣子如下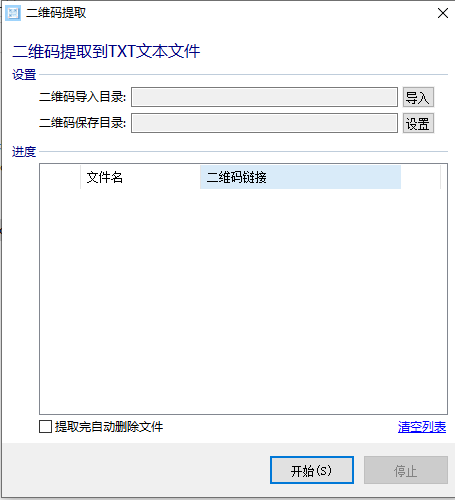
我一看這個工具,感覺功能實現上比較簡單,但我后來想了想這個工具功能雖然簡單,但使用的人群還是比較多的,于是今天抽出幾分鐘的時間把這個工具的核心代碼擼了擼,雖然沒有做GUI,但運行代碼基本上功能都實現了
要識別的二維碼圖片()如下:
我的python環境是python3.8 創建目錄qrcode目錄,進入改目錄執行如下代碼
cd qrcodepython -m venv venv\venv\Scripts\Activate.ps1 # windows powershell 執行進入python虛擬環境# 安裝 pyzbar 模塊
pip install pyzbar
#安裝 PIL庫
pip install pillow
from PIL import Image
import pyzbar.pyzbar as pyzbarimg_path = 'qrcode.png'
img = Image.open(img_path)#使用pyzbar解析二維碼圖片內容
barcodes = pyzbar.decode(img)#打印解析結果,從結果上可以看出,data是識別到的二維碼內容,rect是二維碼所在的位置
print(barcodes)
# [Decoded(data=b'http://www.h3blog.com', type='QRCODE', rect=Rect(left=7, top=7, width=244, height=244), polygon=[Point(x=7, y=7), Point(x=7, y=251), Point(x=251, y=251), Point(x=251, y=7)])]for barcode in barcodes:barcode_content = barcode.data.decode('utf-8') # 二維碼內容print(barcode_content)barcode_rect = barcode.rect # 二維碼在圖片中的位置qr_size = list(barcode_rect) #二維碼大小print(qr_size)
我們把上面的代碼重構下,做一個批量識別二維碼的小工具,程序讀取指定目錄下面的圖片,將識別結果保存到txt文件中
代碼如下保存成 qrcode.py:
from PIL import Image
import pyzbar.pyzbar as pyzbar
import osdef qrcode_parse_content(img_path):'''單張圖片的二維碼解析'''img = Image.open(img_path)#使用pyzbar解析二維碼圖片內容barcodes = pyzbar.decode(img)#打印解析結果,從結果上可以看出,data是識別到的二維碼內容,rect是二維碼所在的位置# print(barcodes)# [Decoded(data=b'http://www.h3blog.com', type='QRCODE', rect=Rect(left=7, top=7, width=244, height=244), polygon=[Point(x=7, y=7), Point(x=7, y=251), Point(x=251, y=251), Point(x=251, y=7)])]result = []for barcode in barcodes:barcode_content = barcode.data.decode('utf-8')result.append(barcode_content)return resultdef load_imgs(folder):'''加載文件夾下的圖片'''imgs = []for img_path in os.listdir(folder):ext = os.path.splitext(img_path)if len(ext) > 1 and is_img(ext[1]):imgs.append(img_path)return imgsdef is_img(ext):'''判斷文件后綴是否是圖片'''ext = ext.lower()if ext == '.jpg':return Trueelif ext == '.png':return Trueelif ext == '.jpeg':return Trueelif ext == '.bmp':return Trueelse:return Falseif __name__ == "__main__":imgs = load_imgs('./') # 打開圖片文件夾,我這里是當前程序運行目錄contents = []for img in imgs:contents.extend(qrcode_parse_content(img))file = './result.txt' # 寫入文件路徑,我這里程序當前運行目錄下的result.txtwith open(file,'w') as f:for c in contents:f.write(c + '\n')
運行
python qrcode.py
這里面注意是運用pyzbar識別二維碼,整個過程比較簡單,上述代碼供大家參考,當然加上GUI界面操作就有一點點的小逼格了,2333333
版权声明:本站所有资料均为网友推荐收集整理而来,仅供学习和研究交流使用。

工作时间:8:00-18:00
客服电话
电子邮件
admin@qq.com
扫码二维码
获取最新动态