idea的快捷鍵
查找某個類crtl+shift+n
查找該類的繼承關系ctrl+h
該博文的總結通過
【尚硅谷】SpringMVC 2021新版教程丨一套快速上手spring mvc
總結的博文大致如下
加上了自已的理解以及對某一部分知識的補充以及完善
菜鳥教程javaweb。所謂的mvc是軟件架構的思想按照照模型、視圖、控制器劃分
主要的工作流程:
通過視圖層(html或者jsp界面)信息交互進行發送請求到服務器,在服務器中請求被控制層接收,之后調用相應的模型層處理請求,處理結果返回控制層,控制層根據結果返回到相應的視圖,渲染數據后最終響應給瀏覽器
使用@controller創建控制器對象(普通類的對象),把對象放入到springmvc容器中,把創建的對象作為接受用戶的需求,顯示處理結果,相當于servlet(繼承http)但它不是servlet,只不過功能相似
jsp請求給中央調度器,再把請求轉發分配給controller對象(可以多個)

主要的特點是:
Spring 家族原生產品,與 IOC 容器等基礎設施無縫對接
創建maven工程,默認jar包,要弄成web工程需要轉換為web包
javaweb從入門到項目實踐,添加適應的依賴包
<dependencies><!-- SpringMVC --><dependency><groupId>org.springframework</groupId><artifactId>spring-webmvc</artifactId><version>5.3.1</version></dependency><!-- 日志 --><dependency><groupId>ch.qos.logback</groupId><artifactId>logback-classic</artifactId><version>1.2.3</version></dependency><!-- ServletAPI --><dependency><groupId>javax.servlet</groupId><artifactId>javax.servlet-api</artifactId><version>3.1.0</version><scope>provided</scope></dependency><!-- Spring5和Thymeleaf整合包 --><dependency><groupId>org.thymeleaf</groupId><artifactId>thymeleaf-spring5</artifactId><version>3.0.12.RELEASE</version></dependency>
</dependencies>
以上添加的Thymeleaf依賴包
詳情可看我這篇文章的知識點
SpringBoot集成Thymeleaf從入門到精通(全)
主要是通過試圖控制控制頁面的內容
xml文件的配置,在module模塊中也要選對好路徑
一般有默認配置的方式和擴展配置的方式
默認配置方式
配置文件默認位于WEB-INF 下,默認名稱為<servlet-name>- servlet.xml
/ 主要是為了jsp不能匹配,本質是servlet,不需要dispatcherservlet做攔截處理/* 是可以匹配所有文件設置springMVC的核心控制器所能處理的請求的請求路徑
Springboot教程、之所以/不能匹配jsp頁面,jsp的本質本身是一個servlet,所以不需要通過DispatcherServlet進行匹配,如果強行要用DispatcherServlet進行匹配jsp頁面,當成一個普通的處理,最后jsp頁面就不會被顯示到(因為jsp頁面是需要處理才可以被返回,而如果直接匹配的話,會直接返回jsp頁面)
<servlet><servlet-name>springMVC</servlet-name><servlet-class>org.springframework.web.servlet.DispatcherServlet</servlet-class>
</servlet><servlet-mapping><servlet-name>springMVC</servlet-name><url-pattern>/</url-pattern>
</servlet-mapping>
擴展配置方式
添加一個初始化參數,可以配置配置文件的位置和名稱
contextConfigLocation<init-param><param-name>contextConfigLocation</param-name><!-- 使用classpath:表示從類路徑查找配置文件,例如maven工程中的 src/main/resources --><param-value>classpath:springMVC.xml</param-value>
</init-param>
在中間添加一些代碼
<!--作為框架的核心組件,在啟動過程中有大量的初始化操作要做 而這些操作
放在第一次請求時才執行會嚴重影響訪問速度 因此需要通過此標簽將啟動控制
DispatcherServlet的初始化時間提前到服務器啟動時 -->
<load-on-startup>1</load-on-startup>
@Controller
public class HelloController {}
這些注解如果標紅,詳情可看這篇文章
springmvc中注解標紅的解決方法(萬能)
<context:component-scan base-package="com.atguigu.mvc.controller"></context:component-scan>
<!-- 配置Thymeleaf視圖解析器 -->
<bean id="viewResolver" class="org.thymeleaf.spring5.view.ThymeleafViewResolver"><property name="order" value="1"/><property name="characterEncoding" value="UTF-8"/><property name="templateEngine"><bean class="org.thymeleaf.spring5.SpringTemplateEngine"><property name="templateResolver"><bean class="org.thymeleaf.spring5.templateresolver.SpringResourceTemplateResolver"><!-- 視圖前綴 --><property name="prefix" value="/WEB-INF/templates/"/><!-- 視圖后綴 --><property name="suffix" value=".html"/><property name="templateMode" value="HTML5"/><property name="characterEncoding" value="UTF-8" /></bean></property></bean></property>
</bean>
解釋以上的配置文件
java流程,具體跳轉的界面為html文件
文件路徑在上面的前綴和后綴中
以下主要是Thymeleaf的命名空間,主要格式是
xmlns:th="http://www.thymeleaf.org"
<!DOCTYPE html>
<html lang="en" xmlns:th="http://www.thymeleaf.org">
<head><meta charset="UTF-8"><title>首頁</title>
</head>
<body>
<h1>首頁</h1>
<a th:href="@{/target}">訪問目標頁面target.html</a>
</body>
</html>
@RequestMapping("/")請求映射
將當前的請求控制器映射方法,通過該注解,實現該注解中的方法
通過請求路徑或者請求參數返回,value屬性賦值的時候value可以不寫
在方法中返回的結果只要是index就可以,因為后綴名html已經有了
@Controller
public class HelloController {//  通過@RequestMapping注解,可以通過請求路徑匹配要處理的具體的請求//  /表示的當前工程的上下文路徑@RequestMapping("/")public String index(){return "index";}
}
/通過解析前綴,再加上index之后加上后綴就會識別
具體代碼步驟的邏輯思路如下

@RequestMapping注解的作用就是將請求和處理請求的控制器方法關聯
起來,建立映射關系
@RequestMapping標識一個類:設置映射請求的請求路徑的初始信息@RequestMapping標識一個方法:設置映射請求請求路徑的具體信息主要用在不同模塊中的同一個名稱,防止名稱混亂
@RequestMapping("/testBean")
public String testBean(User user){System.out.println(user);return "success";
@RequestMapping(value = {"/testRequestMapping", "/test"},)
public String success(){return "success";
}
在xml配置文件中這樣設置
<a th:href="@{/testRequestMapping}">測試RequestMapping注解的value屬性-->/testRequestMapping</a><br>
<a th:href="@{/test}">測試RequestMapping注解的value屬性-->/test</a><br>
若當前請求的請求地址滿足請求映射的value屬性,但是請求方式不滿足method屬性,則瀏覽器報錯405:Request method 'POST' not supported
@RequestMapping(value = {"/testRequestMapping", "/test"},method = {RequestMethod.GET, RequestMethod.POST}
)
在xml配置文件中這樣設置
<a th:href="@{/test}">測試RequestMapping注解的method屬性-->GET</a><br>
<form th:action="@{/test}" method="post"><input type="submit" value="測試RequestMapping注解的method屬性-->POST">
</form>
SpringMVC中提供了@RequestMapping的派生注解
@GetMapping@PostMapping@PutMapping@DeleteMapping常用的請求方式有get,post,put,delete
具體這部分內容可查看我在springboot中寫過的restful的內容
springboot從入門到精通(全)
@GetMapping("/testGetMapping")
public String testGetMapping(){return "success";
}@RequestMapping(value = "/testPut", method = RequestMethod.PUT)
public String testPut(){return "success";
}
xml文件配置
<a th:href="@{/testGetMapping}">測試GetMapping注解-->/testGetMapping</a><br>
<form th:action="@{/testPut}" method="put"><input type="submit" value="測試form表單是否能夠發送put或delete請求方式">
</form>
這個配置都要滿足才可以,上面兩個參數屬性只要滿足其中一個就可以
一個字符串類型的數組,可以通過四種表達式設置請求參數和請求映射的匹配關系
具體參數結構有以下四種
"param":要求請求映射所匹配的請求必須攜帶param請求參數"!param":要求請求映射所匹配的請求必須不能攜帶param請求參數"param=value":要求請求映射所匹配的請求必須攜帶param請求參數且param=value"param!=value":要求請求映射所匹配的請求必須攜帶param請求參數但是param!=value@RequestMapping(value = "/testParamsAndHeaders",params = {"username","password!=123456"}
)
public String testParamsAndHeaders(){return "success";
}
xml文件配置
<a th:href="@{/testParamsAndHeaders(username='admin',password=123)}">測試RequestMapping注解的params屬性-->/testParamsAndHeaders</a><br
通過請求的請求頭信息匹配請求映射,字符串類型的數組,可以通過四種表達式設置請求頭信息和請求映射的匹配關系
"header":要求請求映射所匹配的請求必須攜帶header請求頭信息"!header":要求請求映射所匹配的請求必須不能攜帶header請求頭信息"header=value":要求請求映射所匹配的請求必須攜帶header請求頭信息且header=value"header!=value":要求請求映射所匹配的請求必須攜帶header請求頭信息且header!=value@RequestMapping(value = "/testParamsAndHeaders",params = {"username","password!=123456"},headers = {"Host=localhost:8080"}
)
public String testParamsAndHeaders(){return "success";
}
xml文件配置
<a th:href="@{/testParamsAndHeaders(username='admin',password=123)}">測試RequestMapping注解的params屬性-->/testParamsAndHeaders</a><br
?:表示任意的單個字符(不可是?或者是/)*:表示任意的0個或多個字符(不可是?或者是/)**:表示任意的一層或多層目錄(a**a,前后一定都是a在加/)注意:在使用時,只能使用//xxx的方式
//@RequestMapping("/a?a/testAnt")
//@RequestMapping("/a*a/testAnt")
@RequestMapping("/**/testAnt")
public String testAnt(){return "success";
}
xml文件配置
<a th:href="@{/a1a/testAnt}">測試@RequestMapping可以匹配ant風格的路徑-->使用?</a><br>
<a th:href="@{/a1a/testAnt}">測試@RequestMapping可以匹配ant風格的路徑-->使用*</a><br>
<a th:href="@{/a1a/testAnt}">測試@RequestMapping可以匹配ant風格的路徑-->使用**</a><br>
原始方式:/deleteUser?id=1
restful方式:/deleteUser/1
這個restful在springboot的框架也有提到,我在上文中也提到了該鏈接
再次附上鏈接
具體這部分內容可查看我在springboot中寫過的restful的內容
springboot從入門到精通(全)
而且使用restful傳入參數的時候可以使用問號或者使用括號兩種方式
th:href="@{/testParamsAndHeaders(username='admin',password=123)}"th:href="@{/testParamsAndHeaders?username='admin'&password=123}"SpringMVC路徑中的占位符常用于RESTful風格中,當請求路徑中將某些數據通過路徑的方式傳輸到服務器中,就可以在相應的@RequestMapping注解的value屬性中通過占位符{xxx}表示傳輸的數據,在通過@PathVariable注解,將占位符所表示的數據賦值給控制器方法的形參
傳入的參數都是在后面加上{名字任意}
之后在代碼中通過@PathVariable注解,將其占位符的數據傳入,用的相對應的數據
@RequestMapping("/testPath/{id}/{username}")
public String testPath(@PathVariable("id")Integer id, @PathVariable("username") String username){System.out.println("id:"+id+",username:"+username);return "success";
}
xml文件配置
<a th:href="@{/testPath/1/admin}">測試@RequestMapping支持路徑中的占位符-->/testPath</a><br>
通過上文中的路徑傳入參數獲取了請求,之后如何獲取參數可繼續往下查看
獲取了url請求之后,要獲取得到的參數,使用原生的servlet的該如何進行傳參
java代碼
通過HttpServletRequest類,將其實參賦值給形參,之后使用其類下的參數進行獲取參數getParameter
@RequestMapping("/testServletAPI")
//形參位置的request表示當前請求
public String testServletAPI(HttpServletRequest request){HttpSession session = request.getSession();String username = request.getParameter("username");String password = request.getParameter("password");System.out.println("username:"+username+",password:"+password);return "success";
}
xml 文件配置
<a th:href="@{/testServletAPI(username='admin',password=123456)}">測試使用servletAPI獲取請求參數</a><br>
前端控制器,請求和控制器匹配,之后通過DispatcherServlet
因為springmvc有自已的servlet,而且本身會自動調用,原生的可能會比較麻煩,所以使用springmvc中的DispatcherServlet
@RequestMapping("/testParam")
public String testParam(String username, String password){ System.out.println("username:"+username+",password:"+password); return "success";}
xml文件配置
<a th:href="@{/testParam(username='admin',password=123456)}">測試使用控制器的形參獲取請求參數</a><br>
如果有同名可以通過字符串或者數組進行輸出
Arrays.toString(hobby)@RequestMapping("/testParam")
public String testParam(String username,String password,String[] hobby//若請求參數中出現多個同名的請求參數,可以再控制器方法的形參位置設置字符串類型或字符串數組接收此請求參數//若使用字符串類型的形參,最終結果為請求參數的每一個值之間使用逗號進行拼接System.out.println("username:"+username+",password:"+password+",hobby:"+ Arrays.toString(hobby));return "success";
}
xml文件配置
<form th:action="@{/testParam}" method="get">用戶名:<input type="text" name="user_name"><br>密碼:<input type="password" name="password"><br>愛好:<input type="checkbox" name="hobby" value="a">a<input type="checkbox" name="hobby" value="b">b<input type="checkbox" name="hobby" value="c">c<br><input type="submit" value="測試使用控制器的形參獲取請求參數">
</form>
@RequestParam
將請求參數和控制器方法的形參創建映射關系
一共有三個參數:
value:指定為形參賦值的請求參數的參數名required:設置是否必須傳輸此請求參數,默認值為true,若設置為true時,則當前請求必須傳輸value所指定的請求參數,若沒有傳輸該請求參數,且沒有設置defaultValue屬性,則頁面報錯400:Required String parameter ‘xxx’ is not present;若設置為false,則當前請求不是必須傳輸value所指定的請求參數,若沒有傳輸,則注解所標識的形參的值為nulldefaultValue:不管required屬性值為true或false,當value所指定的請求參數沒有傳輸或傳輸的值為""時,則使用默認值為形參賦值@RequestHeader將請求頭信息和控制器方法的形參創建映射關系,參數也是有三個,用法同@RequestParam
@CookieValue將cookie數據和控制器方法的形參創建映射關系,參數也是有三個,用法同@RequestParam
getSession(),且只能在原生servlet中使用@RequestParam(value = "user_name") String username相當于取了一個別名,前端代碼的別名是user_name,將其代碼更改為username,之后再調用這參數@RequestMapping("/testServletAPI")
//形參位置的request表示當前請求
public String testServletAPI(HttpServletRequest request){HttpSession session = request.getSession();String username = request.getParameter("username");String password = request.getParameter("password");System.out.println("username:"+username+",password:"+password);return "success";
}@RequestMapping("/testParam")
public String testParam(@RequestParam(value = "user_name", required = false, defaultValue = "hehe") String username,String password,String[] hobby,@RequestHeader(value = "sayHaha", required = true, defaultValue = "haha") String host,@CookieValue("JSESSIONID") String JSESSIONID){//若請求參數中出現多個同名的請求參數,可以再控制器方法的形參位置設置字符串類型或字符串數組接收此請求參數//若使用字符串類型的形參,最終結果為請求參數的每一個值之間使用逗號進行拼接System.out.println("username:"+username+",password:"+password+",hobby:"+ Arrays.toString(hobby));System.out.println("host:"+host);System.out.println("JSESSIONID:"+JSESSIONID);return "success";
}
xml文件配置
<form th:action="@{/testParam}" method="get">用戶名:<input type="text" name="user_name"><br>密碼:<input type="password" name="password"><br>愛好:<input type="checkbox" name="hobby" value="a">a<input type="checkbox" name="hobby" value="b">b<input type="checkbox" name="hobby" value="c">c<br><input type="submit" value="測試使用控制器的形參獲取請求參數">
</form>
可以在控制器方法的形參位置設置一個實體類類型的形參,此時若瀏覽器傳輸的請求參數的參數名和實體類中的屬性名一致,那么請求參數就會為此屬性賦值
實體類
實體類的變量定義要和后臺的數據也相同
public class User {private Integer id;private String username;private String password;private Integer age;private String sex;private String email;public User() {}public User(Integer id, String username, String password, Integer age, String sex, String email) {this.id = id;this.username = username;this.password = password;this.age = age;this.sex = sex;this.email = email;}@Overridepublic String toString() {return "User{" +"id=" + id +", username='" + username + '\'' +", password='" + password + '\'' +", age=" + age +", sex='" + sex + '\'' +", email='" + email + '\'' +'}';}public Integer getId() {return id;}public void setId(Integer id) {this.id = id;}public String getUsername() {return username;}public void setUsername(String username) {this.username = username;}public String getPassword() {return password;}public void setPassword(String password) {this.password = password;}public Integer getAge() {return age;}public void setAge(Integer age) {this.age = age;}public String getSex() {return sex;}public void setSex(String sex) {this.sex = sex;}public String getEmail() {return email;}public void setEmail(String email) {this.email = email;}
}
之后通過控制層面的代碼進行獲取
將其傳入實體類對象
@RequestMapping("/testBean")
public String testBean(User user){System.out.println(user);return "success";
}
xml文件的配置要和實體類的變量一一對應
</form>
<form th:action="@{/testBean}" method="post">用戶名:<input type="text" name="username"><br>密碼:<input type="password" name="password"><br>性別:<input type="radio" name="sex" value="男">男<input type="radio" name="sex" value="女">女<br>年齡:<input type="text" name="age"><br>郵箱:<input type="text" name="email"><br><input type="submit" value="使用實體類接收請求參數">
</form>
最后輸出的結果可能會有亂碼
如果請求時get,亂碼的修改方式通過tomcat的配置文件中的server.xml
具體如下

將其配置文件添加如下代碼

修改為
<Connector port="8080" URIEncoding="UTF-8" protocol="HTTP/1.1"connectionTimeout="20000"redirectPort="8443" />
如果請求是post,修改亂碼的方式為
服務器啟動時去配置,因為servlet最快配置,所以要在這之前進行
具體優先順序為:監聽器,過濾器,servlet
所以我們添加一個過濾器的修改
具體亂碼的一個過濾器是這個類CharacterEncodingFilter
所有的請求都可能是post請求,所以設置的路徑為/*
在web.xml配置文件中配置過濾器
<filter><filter-name>CharacterEncodingFilter</filter-name><filter-class>org.springframework.web.filter.CharacterEncodingFilter</filter-class><init-param><param-name>encoding</param-name><param-value>UTF-8</param-value></init-param><init-param><param-name>forceResponseEncoding</param-name><param-value>true</param-value></init-param>
</filter>
<filter-mapping><filter-name>CharacterEncodingFilter</filter-name><url-pattern>/*</url-pattern>
</filter-mapping>
具體這么設置,通過查看其源碼
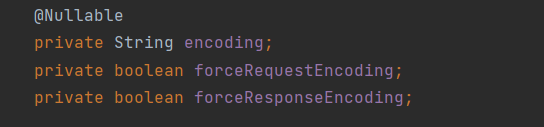
在源碼中本身設置的encoding為null,所以需要配置一個UTF-8
本身在源碼的實現類中的實現方法中
如果為null就會不執行,所以我們需要設置一個UTF-8的編碼方式
再者也不需要修改強制請求的編碼,只需要修改強制接收的編碼請求為true即可

SpringMVC中處理編碼的過濾器一定要配置到其他過濾器之前,否則無效
共享數據有三種方式
將請求參數作為參數,調用servlet數據,之后調用dao層的后臺數據庫作為交互,之后在返回控制層
基本的流程,和之前一樣,都是建立框架


之后的控制器代碼如下所示
使用原生servletapi進行獲取數據層面
通過一個頁面轉發獲取得到另外一個頁面的數據
//轉發數據獲取得到的頁面
<p th:text="${testRequestScope}"></p>//主頁面的跳轉
<a th:href="@{/testRequestByServletAPI}">通過servletAPI向request域對象共享數據</a><br>
控制層面的代碼
//使用servletAPI向request域對象共享數據
@RequestMapping("/testRequestByServletAPI")
public String testRequestByServletAPI(HttpServletRequest request){request.setAttribute("testRequestScope", "hello,servletAPI");return "success";
}
ModelAndView有Model和View的功能
該類的了解可通過我之前的博文進行學習
SpringMVC之ModelAndView類詳細分析(全)
使用springmvc自帶的類來獲取
@RequestMapping("/testModelAndView")
public ModelAndView testModelAndView(){ModelAndView mav = new ModelAndView();//處理模型數據,即向請求域request共享數據mav.addObject("testRequestScope", "hello,ModelAndView");//設置視圖名稱mav.setViewName("success");return mav;
}
@RequestMapping("/testModel")
public String testModel(Model model){model.addAttribute("testRequestScope", "hello,model");System.out.println(model);return "success";
}
@RequestMapping("/testMap")
public String testMap(Map<String, Object> map){map.put("testRequestScope", "hello,map");System.out.println(map);return "success";
}
@RequestMapping("/testModelMap")
public String testModelMap(ModelMap modelMap){modelMap.addAttribute("testRequestScope", "hello,ModelMap");System.out.println(modelMap);return "success";
}
Model、ModelMap、Map的關系
參數其實本質上都是 BindingAwareModelMap 類型的
查看其類中的實現,基本都是BindingAwareModelMap實現
具體執行方法如下

而且通過輸出每一個類的真正執行類都是輸出的結果
說明改寫了tostring的方法
通過顯示其正式的執行類model.getClass().getName(),結果都是BindingAwareModelMap
頁面顯示的界面代碼
<!DOCTYPE html>
<html lang="en" xmlns:th="http://www.thymeleaf.org">
<head><meta charset="UTF-8"><title>Title</title>
</head>
<body>
<h1>首頁</h1>
<a th:href="@{/testRequestByServletAPI}">通過servletAPI向request域對象共享數據</a><br>
<a th:href="@{/testModelAndView}">通過ModelAndView向request域對象共享數據</a><br>
<a th:href="@{/testModel}">通過Model向request域對象共享數據</a><br>
<a th:href="@{/testMap}">通過map向request域對象共享數據</a><br>
<a th:href="@{/testModelMap}">通過ModelMap向request域對象共享數據</a><br></body>
</html>
正式跳轉的界面代碼
<!DOCTYPE html>
<html lang="en" xmlns:th="http://www.thymeleaf.org">
<head><meta charset="UTF-8"><title>Title</title>
</head>
<body>
success<br>
<p th:text="${testRequestScope}"></p></body>
</html>
在了解這一部分的內容時
可了解session數據的鈍化與活化
具體可參考這篇文章
Session 的鈍化與活化
登錄的時候才會使用到session數據,保存用戶的登陸狀態,也就是持久化配置(關閉服務器的時候還有反應)
tomcat中session持久化配置(全)
@RequestMapping("/testSession")
public String testSession(HttpSession session){session.setAttribute("testSessionScope", "hello,session");return "success";
}
配置比較大的數據才會使用application
@RequestMapping("/testApplication")
public String testApplication(HttpSession session){ServletContext application = session.getServletContext();application.setAttribute("testApplicationScope", "hello,application");return "success";
}
以上兩個頁面的顯示都在這
<a th:href="@{/testSession}">通過servletAPI向session域對象共享數據</a><br>
<a th:href="@{/testApplication}">通過servletAPI向application域對象共享數據</a><br>
第二個跳轉的頁面顯示
<p th:text="${session.testSessionScope}"></p>
<p th:text="${application.testApplicationScope}"></p>
總結
傳入model視圖
都是通過這個方法進行獲取

具體獲取視圖的源碼都是通過

當控制器方法中所設置的視圖名稱沒有任何前綴時,此時的視圖名稱會被SpringMVC配置文件中所配置的視圖解析器解析,視圖名稱拼接視圖前綴和視圖后綴所得到的最終路徑,會通過轉發的方式實現跳轉
@RequestMapping("/testThymeleafView")
public String testThymeleafView(){return "success";
}
類似這種沒有加前綴后綴的都是使用的ThymeleafView來進行解析的
SpringMVC中默認的轉發視圖是InternalResourceView
SpringMVC中創建轉發視圖的情況:
當控制器方法中所設置的視圖名稱以"forward:"為前綴時,創建InternalResourceView視圖,此時的視圖名稱不會被SpringMVC配置文件中所配置的視圖解析器解析,而是會將前綴"forward:"去掉,剩余部分作為最終路徑通過轉發的方式實現跳轉
例如"forward:/",“forward:/employee”
測試代碼
不可以使用全路徑,使用全路徑還不如直接去掉forward,而且之后又是ThymeleafView來解析
@RequestMapping("/testForward")
public String testForward(){return "forward:/testThymeleafView";
}
SpringMVC中默認的重定向視圖是RedirectView
當控制器方法中所設置的視圖名稱以"redirect:"為前綴時,創建RedirectView視圖,此時的視圖名稱不會被SpringMVC配置文件中所配置的視圖解析器解析,而是會將前綴"redirect:"去掉,剩余部分作為最終路徑通過重定向的方式實現跳轉
重定向不能訪問WEB-INF下的資源,但是這里將重定向作為一次請求,請求匹配到的方法是通過轉發訪問來進行
例如"redirect:/",“redirect:/employee”
測試代碼
@RequestMapping("/testRedirect")
public String testRedirect(){return "redirect:/testThymeleafView";
}
基于以上轉發和重定向的區別異同等
可看我之前的文章
轉發和重定向的區別及使用方法(全)
當控制器方法中,僅僅用來實現頁面跳轉,即只需要設置視圖名稱時,可以將處理器方法使用viewcontroller標簽進行表示
當前的請求映射所對應的控制器中沒有其他方法的時候可以使用這種
在springmvc.xml中配置
<mvc:view-controller path="/" view-name="index"></mvc:view-controller>控制器中所有的請求映射不保證失效的話要添加如下配置
在SpringMVC的核心配置文件中設置開啟mvc注解驅動的標簽
<!--開啟mvc的注解驅動-->
<mvc:annotation-driven />
如果使用的jsp頁面,鏈接可以不用Thymeleaf的格式,但是路徑不能使用相對路徑,因為超鏈接使用的是絕對路徑來獲取,但是如果寫了絕對路徑,封鎖住了上下文,路徑就不是很靈活。為此引入了動態獲取的方式
pageContext,獲取上下文的路徑request.contextPath主要區別在于jsp的頁面顯示
<%@ page contentType="text/html;charset=UTF-8" language="java" %>
<html>
<head><title>Title</title>
</head>
<body>
<h1>首頁</h1>
<a href="${pageContext.request.contextPath}/success">success.jsp</a>
</body>
</html>
在其springmvc.xml中不用thymeleaf配置,只需要配置其InternalResourceViewResolver
<bean class="org.springframework.web.servlet.view.InternalResourceViewResolver"><property name="prefix" value="/WEB-INF/templates/"></property><property name="suffix" value=".jsp"></property>
</bean>
主要的鏈接可看我之前的文章
RESTFul從入門到精通超全解析(全)
HttpMessageConverter(報文信息轉換器)
HttpMessageConverter提供了兩個注解和兩個類型:
@RequestBody可以獲取請求體,需要在控制器方法設置一個形參,使用@RequestBody進行標識,當前請求的請求體就會為當前注解所標識的形參賦值
設置一個主頁面的跳轉信息
<mvc:view-controller path="/" view-name="index"></mvc:view-controller>
主頁面的index的信息為
只有post才有請求頭,所以要將method設置為post請求
通過在表格中加入一些信息,點擊提交會跳轉到某個頁面
<form th:action="@{/testRequestBody}" method="post"><input type="text" name="username"><input type="text" name="password"><input type="submit" value="測試@RequestBody">
</form>
這個頁面的主要邏輯功能為
在終端中輸出在表單中填寫的具體信息
而且返回通過點擊按鈕,返回的是一個success頁面信息
@RequestMapping("/testRequestBody")
public String testRequestBody(@RequestBody String requestBody){System.out.println("requestBody:"+requestBody);return "success";
}
RequestEntity封裝請求報文的一種類型,需要在控制器方法的形參中設置該類型的形參,當前請求的請求報文就會賦值給該形參,可以通過getHeaders()獲取請求頭信息,通過getBody()獲取請求體信息
具體控制層面的代碼信息為
@RequestMapping("/testRequestEntity")
public String testRequestEntity(RequestEntity<String> requestEntity){//當前requestEnity表示整個請求報文的信息System.out.println("請求頭:"+requestEntity.getHeaders());System.out.println("請求體:"+requestEntity.getBody());return "success";
}
<form th:action="@{/testRequestEntity}" method="post"><input type="text" name="username"><input type="text" name="password"><input type="submit" value="測試RequestEntity">
</form>
@RequestMapping("/testResponse")
public void testResponse(HttpServletResponse response) throws IOException {response.getWriter().print("hello,response");
}
其頁面信息為
<a th:href="@{/testResponse}">通過servletAPI的response對象響應瀏覽器數據</a><br>
@ResponseBody用于標識一個控制器方法,可以將該方法的返回值直接作為響應報文的響應體響應到瀏覽器
當成是一個響應體返回數據而不是視圖名稱
控制層面的代碼為
@RequestMapping(value = "/testResponseBody")
@ResponseBody
public String testResponseBody(){return "成功";
}
其頁面信息為
<a th:href="@{/testResponseBody}">通過@ResponseBody響應瀏覽器數據</a><br>
如果要返回一個java對象必須使用json格式來傳輸
因為是java對象所以會有一個對象類
類似與下面這種

響應報文和請求報文返回規定數據,所以返回的時候不能直接返回一個對象,所以需要轉換一個json(數據交互方式)
加入json
需要添加適應的依賴包即可
添加在pom.xml文件下
<dependency><groupId>com.fasterxml.jackson.core</groupId><artifactId>jackson-databind</artifactId><version>2.12.1</version>
</dependency>
具體的邏輯思路大致如下
MappingJackson2HttpMessageConverter,可以將響應到瀏覽器的Java對象轉換為Json格式的字符串<mvc:annotation-driven />
@RequestMapping("/testResponseUser")
@ResponseBody
public User testResponseUser(){return new User(1001, "admin", "123456", 23, "男");
}
具體的頁面顯示信息如下
<a th:href="@{/testResponseUser}">通過@ResponseBody響應瀏覽器User對象</a><br>
這部分的知識可看我之前的文章
Ajax從入門到精通(全)
通過點擊事件聯合vue界面
具體代碼格式如下
<div id="app"><a @click="testAxios" th:href="@{/testAxios}">SpringMVC處理ajax</a>
</div>
<script type="text/javascript" th:src="@{/static/js/vue.js}"></script>
<script type="text/javascript" th:src="@{/static/js/axios.min.js}"></script>
<script type="text/javascript">new Vue({el:"#app",methods:{testAxios:function (event) {axios({method:"post",url:event.target.href,params:{username:"admin",password:"123456"}}).then(function (response) {alert(response.data);});event.preventDefault();}}});
</script>
控制層面的代碼如下
@RequestMapping("/testAxios")
@ResponseBody
public String testAxios(String username, String password){System.out.println(username+","+password);return "hello,axios";
}
@RestController注解是springMVC提供的一個復合注解,標識在控制器的類上
就相當于為類添加了@Controller注解,并且為其中的每個方法添加了@ResponseBody注解
@RestController=@Controller+@ResponseBody
ResponseEntity用于控制器方法的返回值類型,該控制器方法的返回值就是響應到瀏覽器的響應報文
此處涉及文件的輸入輸出流的一些具體知識可看我之前的文章
java NIO從入門到精通(全)
在springmvc.xml文件中配置
<mvc:view-controller path="/file" view-name="file"></mvc:view-controller>
使用ResponseEntity實現下載文件的功能
@Controller
public class FileUpAndDownController {@RequestMapping("/testDown")public ResponseEntity<byte[]> testResponseEntity(HttpSession session) throws IOException {//獲取ServletContext對象ServletContext servletContext = session.getServletContext();//獲取服務器中文件的真實路徑String realPath = servletContext.getRealPath("/static/img/1.jpg");System.out.println(realPath);//創建輸入流InputStream is = new FileInputStream(realPath);//創建字節數組byte[] bytes = new byte[is.available()];//將流讀到字節數組中is.read(bytes);//創建HttpHeaders對象設置響應頭信息MultiValueMap<String, String> headers = new HttpHeaders();//設置要下載方式以及下載文件的名字headers.add("Content-Disposition", "attachment;filename=1.jpg");//設置響應狀態碼HttpStatus statusCode = HttpStatus.OK;//創建ResponseEntity對象ResponseEntity<byte[]> responseEntity = new ResponseEntity<>(bytes, headers, statusCode);//關閉輸入流is.close();return responseEntity;}
}
"Content-Disposition", 默認的下載功能"attachment;表示附件的意思,filename=1.jpg" 下載完成之后的命名方式具體的主要信息是響應頭,響應體,響應狀態碼,分別一一對應這三個bytes, headers, statusCode
具體的頁面信息為
<a th:href="@{/testDown}">下載1.jpg</a><br>
添加文件上傳的依賴包
<dependency><groupId>commons-fileupload</groupId><artifactId>commons-fileupload</artifactId><version>1.3.1</version>
</dependency>
在springmvc中還要添加如下配置
一定要配置id屬性
class是類路徑名
<!--配置文件上傳解析器,將上傳的文件封裝為MultipartFile-->
<bean id="multipartResolver" class="org.springframework.web.multipart.commons.CommonsMultipartResolver"></bean>
具體的代碼格式為
@RequestMapping("/testUp")
public String testUp(MultipartFile photo, HttpSession session) throws IOException {//獲取上傳的文件的文件名String fileName = photo.getOriginalFilename();//獲取上傳的文件的后綴名String suffixName = fileName.substring(fileName.lastIndexOf("."));//將UUID作為文件名String uuid = UUID.randomUUID().toString().replaceAll("-","");//將uuid和后綴名拼接后的結果作為最終的文件名fileName = uuid + suffixName;//通過ServletContext獲取服務器中photo目錄的路徑ServletContext servletContext = session.getServletContext();//放置到文件的路徑名中String photoPath = servletContext.getRealPath("photo");File file = new File(photoPath);//判斷photoPath所對應路徑是否存在if(!file.exists()){//若不存在,則創建目錄file.mkdir();}String finalPath = photoPath + File.separator + fileName;//上傳文件photo.transferTo(new File(finalPath));return "success";
}
具體的頁面信息為
<form th:action="@{/testUp}" method="post" enctype="multipart/form-data">頭像:<input type="file" name="photo"><br><input type="submit" value="上傳">
</form>
HandlerInterceptor主要的區別在于攔截器中
第一種配置
<!--配置攔截器-->
<mvc:interceptors><ref bean="firstInterceptor"></ref>
</mvc:interceptors>
第二種配置
<!--配置攔截器-->
<mvc:interceptors><ref bean="secondInterceptor"></ref>
</mvc:interceptors>
以上兩種配置方式都是對DispatcherServlet所處理的所有的請求進行攔截
默認對所有的方式進行攔截
第三種配置是指定規則進行排除攔截
第三種配置
<!--配置攔截器-->
<mvc:interceptors><bean class="com.atguigu.mvc.interceptors.FirstInterceptor"></bean><ref bean="firstInterceptor"></ref><mvc:interceptor><mvc:mapping path="/**"/><mvc:exclude-mapping path="/"/><ref bean="firstInterceptor"></ref></mvc:interceptor></mvc:interceptors>
以上配置方式可以通過ref或bean標簽設置攔截器,通過mvc:mapping設置需要攔截的請求,通過 mvc:exclude-mapping設置需要排除的請求,即不需要攔截的請求
主要的攔截器有三個抽象的方法
preHandle:控制器方法執行之前執行preHandle(),其boolean類型的返回值表示是否攔截或放行
返回true為放行,即調用控制器方法;
返回false表示攔截,即不調用控制器方法
postHandle:控制器方法執行之后執行postHandle()
afterComplation:處理完視圖和模型數據,渲染視圖完畢之后執行afterComplation()
要想在攔截的時候輸出,并且修改其配置,只有在第一個方法的返回值那里修改
@Component
public class FirstInterceptor implements HandlerInterceptor {@Overridepublic boolean preHandle(HttpServletRequest request, HttpServletResponse response, Object handler) throws Exception {System.out.println("FirstInterceptor-->preHandle");return true;}@Overridepublic void postHandle(HttpServletRequest request, HttpServletResponse response, Object handler, ModelAndView modelAndView) throws Exception {System.out.println("FirstInterceptor-->postHandle");}@Overridepublic void afterCompletion(HttpServletRequest request, HttpServletResponse response, Object handler, Exception ex) throws Exception {System.out.println("FirstInterceptor-->afterCompletion");}
}
若每個攔截器的preHandle()都返回true
此時多個攔截器的執行順序和攔截器在SpringMVC的配置文件的配置順序有關:
preHandle()會按照配置的順序執行
而postHandle()和afterComplation()會按照配置的反序執行
若某個攔截器的preHandle()返回了false
preHandle()返回false和它之前的攔截器的preHandle()都會執行
postHandle()都不執行
返回false的攔截器之前的攔截器的afterComplation()會執行
SpringMVC提供了一個處理控制器方法執行過程中所出現的異常的接口:HandlerExceptionResolver
HandlerExceptionResolver接口的實現類有:DefaultHandlerExceptionResolver和SimpleMappingExceptionResolver
SpringMVC提供了自定義的異常處理器SimpleMappingExceptionResolver,使用方式:
<bean class="org.springframework.web.servlet.handler.SimpleMappingExceptionResolver"><property name="exceptionMappings"><props><prop key="java.lang.ArithmeticException">error</prop></props></property><!--設置將異常信息共享在請求域中的鍵--><property name="exceptionAttribute" value="ex"></property></bean>
顯示的錯誤信息是算數錯誤,所以返回的頁面如果不帶前后綴,則使用的是Thymeleaf的格式
要顯示的錯誤信息,默認是放在了請求域中,所以通過鍵值對的ex來獲取,在前端界面中獲取ex的值
具體前端的頁面信息為
<!DOCTYPE html>
<html lang="en" xmlns:th="http://www.thymeleaf.org">
<head><meta charset="UTF-8"><title>Title</title>
</head>
<body>
出現錯誤
<p th:text="${ex}"></p>
</body>
</html>
和上面一樣
只需要將其配置去掉即可
在類中添加如下的配置
@ControllerAdvice將當前類標識為異常處理的組件,@ControllerAdvice這個和@component都是差不多標識組件的意思
@ExceptionHandler用于設置所標識方法處理的異常
ex表示當前請求處理中出現的異常對象
@ControllerAdvice
public class ExceptionController {@ExceptionHandler(value = {ArithmeticException.class, NullPointerException.class})public String testException(Exception ex, Model model){model.addAttribute("ex", ex);return "error";}}
將其錯誤信息添加到請求域中并且將其輸出
在Servlet3.0環境中,容器會在類路徑中查找實現javax.servlet.ServletContainerInitializer接口的類,
如果找到的話就用它來配置Servlet容器。 Spring提供了這個接口的實現,名為SpringServletContainerInitializer,這個類反過來又會查找實現WebApplicationInitializer的類并將配
置的任務交給它們來完成。
Spring3.2引入了一個便利的WebApplicationInitializer基礎實現,名為
AbstractAnnotationConfigDispatcherServletInitializer,當我們的類擴展了
AbstractAnnotationConfigDispatcherServletInitializer并將其部署到Servlet3.0容器的時候,容器會自動發現它,并用它來配置Servlet上下文
//web工程的初始化類,用來代替web.xml
public class WebInit extends AbstractAnnotationConfigDispatcherServletInitializer {/*** 指定spring的配置類* @return*/@Overrideprotected Class<?>[] getRootConfigClasses() {return new Class[]{SpringConfig.class};}/*** 指定springMVC的配置類* @return*/@Overrideprotected Class<?>[] getServletConfigClasses() {return new Class[]{WebConfig.class};}/*** 指定DispatcherServlet的映射規則,即url-pattern* @return*/@Overrideprotected String[] getServletMappings() {return new String[]{"/"};}/*** 注冊過濾器* @return*/@Overrideprotected Filter[] getServletFilters() {CharacterEncodingFilter characterEncodingFilter = new CharacterEncodingFilter();characterEncodingFilter.setEncoding("UTF-8");characterEncodingFilter.setForceResponseEncoding(true);HiddenHttpMethodFilter hiddenHttpMethodFilter = new HiddenHttpMethodFilter();return new Filter[]{characterEncodingFilter, hiddenHttpMethodFilter};}
}
創建SpringConfig配置類,代替spring的配置文件
@Configuration
public class SpringConfig {
}/*** 代替SpringMVC的配置文件:* 1、掃描組件 2、視圖解析器 3、view-controller 4、default-servlet-handler* 5、mvc注解驅動 6、文件上傳解析器 7、異常處理 8、攔截器*/
//將當前類標識為一個配置類
@Configuration
//1、掃描組件
@ComponentScan("com.atguigu.mvc.controller")
//5、mvc注解驅動
@EnableWebMvc
public class WebConfig implements WebMvcConfigurer {//4、default-servlet-handler@Overridepublic void configureDefaultServletHandling(DefaultServletHandlerConfigurer configurer) {configurer.enable();}//8、攔截器@Overridepublic void addInterceptors(InterceptorRegistry registry) {TestInterceptor testInterceptor = new TestInterceptor();registry.addInterceptor(testInterceptor).addPathPatterns("/**");}//3、view-controller@Overridepublic void addViewControllers(ViewControllerRegistry registry) {registry.addViewController("/hello").setViewName("hello");}//6、文件上傳解析器@Beanpublic MultipartResolver multipartResolver(){CommonsMultipartResolver commonsMultipartResolver = new CommonsMultipartResolver();return commonsMultipartResolver;}//7、異常處理@Overridepublic void configureHandlerExceptionResolvers(List<HandlerExceptionResolver> resolvers) {SimpleMappingExceptionResolver exceptionResolver = new SimpleMappingExceptionResolver();Properties prop = new Properties();prop.setProperty("java.lang.ArithmeticException", "error");exceptionResolver.setExceptionMappings(prop);exceptionResolver.setExceptionAttribute("exception");resolvers.add(exceptionResolver);}//配置生成模板解析器@Beanpublic ITemplateResolver templateResolver() {WebApplicationContext webApplicationContext = ContextLoader.getCurrentWebApplicationContext();// ServletContextTemplateResolver需要一個ServletContext作為構造參數,可通過WebApplicationContext 的方法獲得ServletContextTemplateResolver templateResolver = new ServletContextTemplateResolver(webApplicationContext.getServletContext());templateResolver.setPrefix("/WEB-INF/templates/");templateResolver.setSuffix(".html");templateResolver.setCharacterEncoding("UTF-8");templateResolver.setTemplateMode(TemplateMode.HTML);return templateResolver;}//生成模板引擎并為模板引擎注入模板解析器@Beanpublic SpringTemplateEngine templateEngine(ITemplateResolver templateResolver) {SpringTemplateEngine templateEngine = new SpringTemplateEngine();templateEngine.setTemplateResolver(templateResolver);return templateEngine;}//生成視圖解析器并未解析器注入模板引擎@Beanpublic ViewResolver viewResolver(SpringTemplateEngine templateEngine) {ThymeleafViewResolver viewResolver = new ThymeleafViewResolver();viewResolver.setCharacterEncoding("UTF-8");viewResolver.setTemplateEngine(templateEngine);return viewResolver;}}@Controller
public class TestController {@RequestMapping("/")public String index(){return "index";}}
用戶向服務器發送請求,請求被SpringMVC 前端控制器 DispatcherServlet捕獲
DispatcherServlet對請求URL進行解析,得到請求資源標識符(URI),判斷請求URI對應的映射:
a) 不存在
i. 再判斷是否配置了mvc:default-servlet-handler
ii. 如果沒配置,則控制臺報映射查找不到,客戶端展示404錯誤
iii. 如果有配置,則訪問目標資源(一般為靜態資源,如JS,CSS,HTML),找不到客戶端也會展示404錯誤
b) 存在則執行下面的流程
根據該URI,調用HandlerMapping獲得該Handler配置的所有相關的對象(包括Handler對象以及Handler對象對應的攔截器),最后以HandlerExecutionChain執行鏈對象的形式返回
DispatcherServlet 根據獲得的Handler,選擇一個合適的HandlerAdapter
如果成功獲得HandlerAdapter,此時將開始執行攔截器的preHandler(…)方法【正向】
提取Request中的模型數據,填充Handler入參,開始執行Handler(Controller)方法,處理請求
在填充Handler的入參過程中,根據你的配置,Spring將幫你做一些額外的工作:
a) HttpMessageConveter: 將請求消息(如Json、xml等數據)轉換成一個對象,將對象轉換為指定的響應信息
b) 數據轉換:對請求消息進行數據轉換。如String轉換成Integer、Double等
c) 數據格式化:對請求消息進行數據格式化。 如將字符串轉換成格式化數字或格式化日期等
d) 數據驗證: 驗證數據的有效性(長度、格式等),驗證結果存儲到BindingResult或Error中
Handler執行完成后,向DispatcherServlet 返回一個ModelAndView對象
此時將開始執行攔截器的postHandle(…)方法【逆向】
根據返回的ModelAndView(此時會判斷是否存在異常:如果存在異常,則執行HandlerExceptionResolver進行異常處理)選擇一個適合的ViewResolver進行視圖解析,根據Model和View,來渲染視圖
渲染視圖完畢執行攔截器的afterCompletion(…)方法【逆向】
將渲染結果返回給客戶端
版权声明:本站所有资料均为网友推荐收集整理而来,仅供学习和研究交流使用。

工作时间:8:00-18:00
客服电话
电子邮件
admin@qq.com
扫码二维码
获取最新动态